Cisco ISE Administrator Accounts: CLI and GUI Access
Overview
Introduction
During the installation of a Cisco ISE node, whether virtualized or deployed on a physical SNS appliance, an initial administrator account must be created. This account is subsequently used to generate two distinct user identities: one for Command Line Interface (CLI) access and one for Graphical User Interface (GUI) access. These accounts are specifically intended for the administration and management of the ISE environment.
The GUI account provides access to the web interface, giving a comprehensive view of the ISE deployment, with visibility tailored to the deployment type and, in distributed environments, to the specific role of each node. The CLI account, on the other hand, is primarily used to access ISE nodes via SSH. Initially, both accounts share the same credentials, allowing the same username and password to authenticate to both interfaces. Once all parameters for the initial configuration set have been entered, the output displays the following entry, confirming the behavior just described.
Copying first CLI user to be first ISE admin GUI user...
ISE implements a Role-Based Access Control (RBAC) model to categorize users according to their responsibilities, defining both the scope of their actions and the level of visibility they require. For each access method, administrators can configure, with fine-grained control, which commands or menus a user may access and which data they are allowed to view. By default, the CLI account is assigned the Admin role, while the GUI account is part of the Super Admin group.
In general, the roles available depend on the access method: the CLI supports only two predefined roles, whereas the GUI provides a broader set of built-in groups and allows the creation of custom groups to meet specific operational requirements.
CLI Access and Privileges
CLI access to ISE can be achieved through multiple methods:
- Local access through the console port.
- Remote connection over SSH.
- Remote connection through the Cisco Integrated Management Controller (CIMC).
Two types of user accounts are available for CLI access: Admin and User, each granting a distinct set of privileges. The Admin account provides elevated privileges for system-level operations, including:
- Start and stop the ISE application.
- Apply software patches and upgrades.
- Reload or shut down the ISE appliance.
- View all system and application logs.
When logged in with an Admin account, a wide range of commands becomes available, as shown below.
ISE-NODE-2/adminCLI#?
Possible completions:
  application         Application Install and Administration
  backup              Backup system
  backup-logs         Backup system and application logs
  clear               Reset functions
  clock               Set the System Clock
  configure           cfg
  copy                Enter URL (use disk:/path/file for local) (Max Size - 2048)
  crypto              Crypto operations
  debug               Debugging functions (see also 'undebug')
  delete              Delete a file
  dir                 List files on local filesystem
  esr                 Enter the Embedded Services Router console
  exit                Exit the management session
  forceout            Force Logout all the sessions of a specific system user
  generate-password   Username for which password has to be generated
  halt                Shutdown the system
  idle-timeout        Idle timeout for all the sessions of a specific system user
  license             License operations
  mkdir               Create new directory
  nslookup            DNS lookup for an IP address or hostname
  password            Update Password
  patch               Install System or Application Patch
  permit              List cli for Secure Tunnel
  ping                Ping a remote ip address
  ping6               Ping a remote ipv6 address
  reload              Reload the system
  reset-config        Reset network and time settings
  restore             Restore system
  rmdir               Remove existing directory
  screen-length       Configure screen length
  screen-width        Configure screen width
  show                Show information about the system
  ssh                 SSH to a remote ip address
  tech                TAC commands
  terminal            Set terminal line parameters
  traceroute          Trace the route to a remote ip address
  undebug             Disable debugging functions (see also 'debug')
  who                 Display currently logged on users
The show command, in particular, grants access to the following system sections.
ISE-NODE-2/adminCLI#show ?
Possible completions:
  application      Display application(s) information
  backup           Show backup information
  banner           Show login banners
  cdp              CDP show commands
  clock            Show clock information
  container        Show container information
  cpu              Display CPU information
  crypto           Display Crypto operations
  disks            Display disk and filesystem information
  esr              Show Embedded Services Router information
  firewall         Show firewall rules
  history          Display CLI command history
  icmp_status      Display icmp echo response configuration information
  interface        Display interface info
  inventory        Display hardware inventory information
  ip               Show IP info
  ipv6             Show IPv6 info
  logging          Display system logging information
  logins           List login history
  memory           Display memory information
  ntp              Show NTP servers
  ports            Display all processes listening on open ports
  process          Display system processes
  repository       Show repository contents
  restore          Show restore information
  running-config   Display current configuration
  snmp-server      Show snmp-server information
  tech-support     Show tech-support details
  terminal         Display terminal configuration parameters
  timezone         Show timezone
  timezones        Show timezones
  udi              Show udi information
  uptime           Display system uptime
  users            Display logged-in users information
  version          Show version info
The second type of CLI user is the User account, which has limited privileges. Consequently, it cannot perform configuration changes, monitor the status of ISE application processes, and is restricted to a subset of basic operational commands, as illustrated below.
ISE-NODE-2/userTest#?
Possible completions:
  crypto       Crypto operations
  exit         Exit the management session
  license      License operations
  nslookup     DNS lookup for an IP address or hostname
  password     Update Password
  ping         Ping a remote ip address
  ping6        Ping a remote ipv6 address
  show         Show information about the system
  terminal     Set terminal line parameters
  traceroute   Trace the route to a remote ip address
This limitation also applies to the information accessible via the show command.
ISE-NODE-2/adminCLI#show ?
Possible completions:
  cdp           CDP show commands
  clock         Show clock information
  cpu           Display CPU information
  crypto        Display Crypto operations
  disks         Display disk and filesystem information
  icmp_status   Display icmp echo response configuration information
  interface     Display interface info
  inventory     Display hardware inventory information
  logins        List login history
  memory        Display memory information
  ntp           Show NTP servers
  ports         Display all processes listening on open ports
  process       Display system processes
  terminal      Display terminal configuration parameters
  timezone      Show timezone
  udi           Show udi information
  uptime        Display system uptime
  version       Show version info
CLI Account Creation
Local CLI accounts can be created by entering configuration mode and executing the following command.
ISE-NODE-2/adminCLI(config)#username <user-name> password <plain | hash> <password> role <admin | user> email <user-email> <disabled>
The parameters that must be specified are:
- Username: The name associated with the account being created. During the initial ISE configuration, the Admin account is assigned the default name admin.
- Password: The password associated with the account. It can be provided either in plain text or as a hash. When entering a plain-text password, characters such as ! and # must be escaped with a backslash. In the running configuration, the password is automatically displayed as a SHA-256 hash.
- Role: The type of role assigned to the user, either Admin or User.
Other parameters that can be specified include:
- Email: Associates an email address with the account. This value may be used to notify the user when their password is approaching expiration, provided the feature is enabled and correctly configured.
- Disabled: Creates the account in a disabled state, meaning it cannot be used until explicitly enabled.
To guarantee that a password meets the required policy on the first attempt, the generate-password <user-name> command can be used to generate a compliant password, as illustrated in the example below.
ISE-NODE-2/adminCLI#generate-password userTest3
3Uj&onhe
The generated password should then be used within the username command.
Once an account has been created, all locally configured CLI accounts, along with their respective statuses, can be verified using the show users status command, as illustrated in the example below.
ISE-NODE-2/adminCLI#show users status

USERNAME         ROLE   DISABLED        LOCKED
adminCLI         Admin
userTest         User
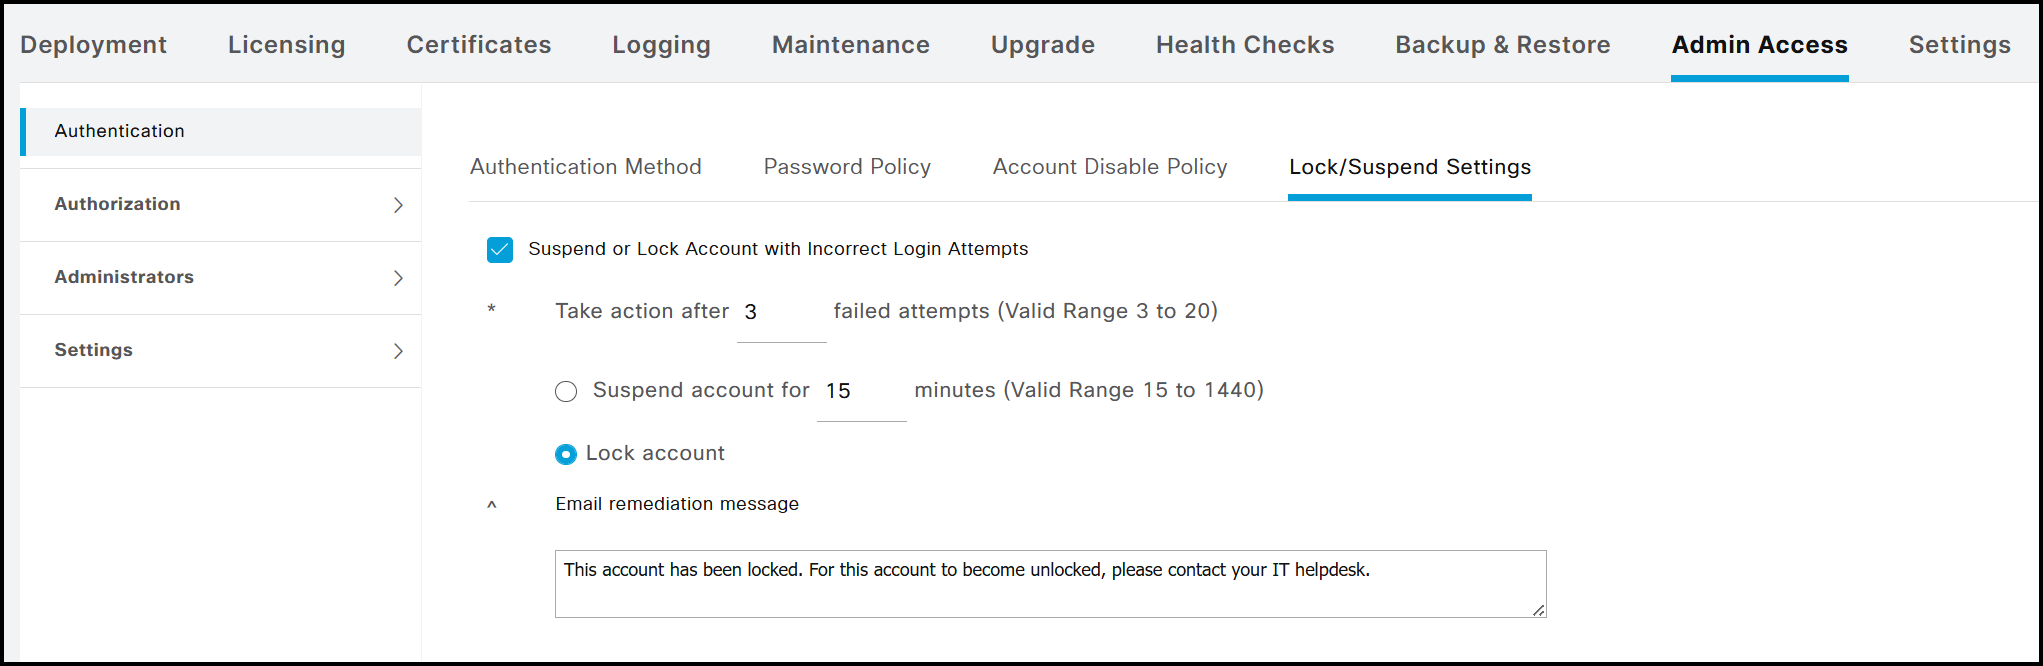
The previous output indicates that, in addition to the Disabled state, a Locked state can also be applied to an account. In the scenario shown in the following figure, if a user attempts to log in multiple times with an incorrect password (three attempts in this example), the CLI account is automatically locked. While rebooting the node could theoretically unlock the account, this would require a scheduled maintenance window in a production environment. Consequently, it is preferable to rely on the temporary suspension mechanism, which locks the account for a defined period (15 minutes in this example) before it automatically becomes available again.
For example, the output below illustrates the result when the user userTest attempts to log in 3 consecutive times with an incorrect password.
ISE-NODE-2/adminCLI#show users status

USERNAME         ROLE   DISABLED        LOCKED
adminCLI         Admin
userTest         User                   *
The difference between Disabled and Locked modes in the CLI can be clearly verified using the show running-config password-policy command. When the Suspend account for X minutes option is selected in the GUI, the running configuration includes the password-lock-timeout entry. Conversely, if the Lock account option is selected, this entry is absent from the configuration.
ISE-NODE-2/adminCLI#show running-config password-policy | include password-lock
 password-lock-enabled
 password-lock-retry-count   3
 password-lock-timeout       15
The above settings are part of ISE’s password policies and will be explained in detail later.
As with accounts created through the CLI, internal administrator accounts created via the GUI can also be viewed. To do this, ISE configuration mode must be accessed by entering the application configure ise command from EXEC mode. The following lists all options available to the Admin CLI users; for the context of this guide, option 15 is the relevant selection.
ISE-NODE-2/adminCLI#application configure ise

Selection configuration option
[1]Reset M&T Session Database
[2]Rebuild M&T Unusable Indexes
[3]Purge M&T Operational Data
[4]Reset M&T Database
[5]Refresh Database Statistics
[6]Display Profiler Statistics
[7]Export Internal CA Store
[8]Import Internal CA Store
[9]Create Missing Config Indexes
[10]Create Missing M&T Indexes
[12]Generate Daily KPM Stats
[13]Generate KPM Stats for last 8 Weeks
[14]Enable/Disable Counter Attribute Collection
[15]View Admin Users
[16]Get all Endpoints
[19]Establish Trust with controller
[20]Reset Context Visibility
[21]Synchronize Context Visibility With Database
[22]Generate Heap Dump
[23]Generate Thread Dump
[24]Force Backup Cancellation
[25]CleanUp ESR 5921 IOS Crash Info Files
[26]Recreate undotablespace
[27]Reset Upgrade Tables
[28]Recreate Temp tablespace
[29]Clear Sysaux tablespace
[30]Fetch SGA/PGA Memory usage
[31]Generate Self-Signed Admin Certificate
[32]View Certificates in NSSDB or CA_NSSDB
[33]Recreate REPLOGNS tablespace
[34]View Native IPSec status
[35]Enable/Disable/Current_status of Audit-Session-ID Uniqueness
[36]Check and Repair Filesystem
[37]Enable/Disable/Current_status of RSA_PSS signature for EAP-TLS
[0]Exit
By entering 15 and pressing Enter, the following output is displayed.
Admin User Report

User Name       Description          Enabled  First Name      Last Name       Email                     Groups
=============== ==================== ======== =============== =============== ========================= ========================================
ERSGUIOper                           ENABLED                                                            ["ERS Operator"]

adminGUI        Default Admin User   ENABLED                                                            ["Super Admin"]

testGui                              ENABLED                                                            ["Super Admin"]
Regarding account creation, when a new account is added, the event can be verified in the CLI logs using the command show logging system ade/ADE.log | include 1018.
2025-11-09T19:10:18.829491+01:00 ISE-NODE-2 CARSSetup[4215]: ADEAUDIT 1018, type=USER, name=USER CONFIGURATION MODIFIED, username=adminCLI, cause=CLI User configuration has been modified, adminipaddress=10.0.0.1, interface=CLI, detail=Added user test with role: Admin state: Enabled successfully
The output displays a log entry containing several details about the newly created account, excluding the password. The information is presented in the following order:
- Log ID, in this case is 1018.
- Description of the logged event, in this case USER CONFIGURATION MODIFIED.
- Administrator account that performed the action, adminCLI in this example.
- IP address from which the administrator was connected when creating the user, in this case 10.0.0.1.
- Type of account that was created, shown in the detail field (here, an Admin user)
- State associated with the account, which in this example is enabled. Using the disabled keyword creates an account in a non-enabled state, making it temporarily unavailable.
The same event can also be verified in an alternative log file, with an example output shown below.
2025-11-09 19:10:18,873 INFO [AdeSyslogProcessor][[]] cpm.infrastructure.systemconfig.syslogproc.AdeSyslogContent -:::::- SCH: InfraTCPMessage: msg: InfraUdpMessage: <130>Nov 9 19:10:18 ISE-NODE-2 CARSSetup[2990]: ADEAUDIT 1018, type=ADMIN, name=USER CONFIGURATION MODIFIED, username=adminCLI, cause=CLI User configuration has been modified, adminipaddress=10.0.0.1, interface=CLI, detail=Added user test with role: Admin state: Enabled successfully
In general, the command used to view log files is show logging <application | system>, depending on whether application-specific or system-wide logs are required.
Additionally, the content of a specific log file can be displayed by appending the file name to this command. For example, to view the contents of the ise-psc.log file, which is closely related to the ISE application server, the show logging application ise-psc.log command can be used. Log files can also be downloaded directly from the GUI by following the path Operations → Troubleshoot → Download Logs → Node → Debug Logs. Once the affected node and the log file to be consulted have been identified, click on the file name to download it to the local machine. For further information, please refer to the References section at the end of the article.
For completeness, an example of the log entry generated for a User-level account is provided below.
2025-11-09T19:19:15.602889+01:00 ISE-NODE-2 CARSSetup[4215]: ADEAUDIT 1018, type=USER, name=USER CONFIGURATION MODIFIED, username=adminCLI, cause=CLI User configuration has been modified, adminipaddress=10.0.0.1, interface=CLI, detail=Added user userTest2 with role: User state: Enabled successfully
Starting with ISE Release 3.3, any user account created via the CLI is required to change its password at first login. The corresponding output is shown below.
login as: userTest2
userTest2@10.0.0.2's password:
Pre-authentication banner message from server:
| You are required to change your password immediately (administrator enforced)
> .
End of banner message from server
You are required to change your password immediately (administrator enforced).
WARNING: Your password has expired.
You must change your password now and login again!
Changing password for user userTest2.
Current password:
New password:
Retype new password:
Once the new password is entered and confirmed, the session is terminated. At the next login, the same user account, userTest2, can be used along with the newly configured password. It is also useful to examine how the node behaves when a user sets a new password. The following logs illustrate this process.
2025-11-09T19:36:09.169359+01:00 ISE-NODE-2 CARSSetup[4215]: ADEAUDIT 1018, type=USER, name=USER CONFIGURATION MODIFIED, username=system, cause=CLI User configuration has been modified, adminipaddress=127.0.0.1, interface=CLI, detail=User userTest2 has been modified with password, role: User state: Enabled successfully
Unlike the previous example, the Username and Source IP Address fields are different. In this case, they are populated with system and 127.0.0.1, which corresponds to the local address of the machine. This occurs because the update is triggered internally by ISE itself. In general, following the creation of an account, whether Admin or User, its password can be changed at any time. A password reset can be performed either directly by the user or by an administrator. For a User account, the password can be reset using the password command from EXEC mode. For an Admin account, the password can be reset not only using the previous method but also with the username… command in configuration mode.
Administrators can modify or delete any account, regardless of role. The recommended procedure for removing an account is as follows:
- Execute the command show running-config username and copy the entry corresponding to the account to be removed.
- Enter configuration mode and issue the same command using the negated form (ie., no username…). This operation is not available to User-level accounts, as access to configuration mode is restricted.
CLI Account Verification
With multiple accounts configured, an administrator may want to review the most recent CLI access attempts on ISE. This can be done using the show logins cli command, which by default displays the last 10 recorded entries. If needed, additional results can be shown by specifying a higher value with show logins cli count <entries-number>.
ISE-NODE-2/adminCLI#show logins cli
userTest2 pts/1        10.0.0.4     Sun Nov  9 16:21   still logged in
userTest2 pts/1        10.0.0.4     Sun Nov  9 16:20 - 16:20  (00:00)
userTest2 pts/1        10.0.0.4     Sun Nov  9 16:20 - 16:20  (00:00)
userTest2 pts/1        10.0.0.4     Sun Nov  9 16:19 - 16:19  (00:00)
userTest2 pts/1        10.0.0.4     Sun Nov  9 16:19 - 16:19  (00:00)
adminCLI pts/0        10.0.0.4     Sun Nov  9 15:53   still logged in
adminCLI pts/0        10.0.0.5     Sat Nov  8 12:40 - 12:52  (00:12)
adminCLI pts/0        10.0.0.5     Sat Nov  8 12:38 - 12:38  (00:00)
adminCLI pts/0        10.0.0.5     Sat Nov  8 12:38 - 12:38  (00:00)
reboot   system boot  4.18.0-425.10.1. Sat Nov  8 12:37   still running

wtmp begins Wed Sep 20 11:56:55 2023
To verify which users are currently connected, the show users command can be used. An example of the output is shown below.
ISE-NODE-2/adminCLI#show users

USERNAME         ROLE   HOST                     TTY      LOGIN DATETIME

adminCLI         Admin  10.0.0.5             pts/0    Sun Nov  9 15:53:33 2025

userTest2        User   10.0.0.4             pts/1    Sun Nov  9 17:27:21 2025

-------------------
DETACHED SESSIONS:
-------------------

USERNAME             ROLE                 STARTDATE

% No disconnected user sessions present
If it becomes necessary to forcibly terminate the session of a specific user who is currently active and appears in the previous output, the command forceout <user-name> can be used.
If an Admin user attempts to delete an account that is currently in an active session, the operation will fail, and the following message will be displayed.
ISE-NODE-2/adminCLI(config)#no username userTest2 password hash $6$bYHkcsJ.vJ1rN4cK$ubRSzaKjeqSglxLrt4icoZDPlb4uGz.Lw6KSXD/CZVGfF2$qbSm8piUyf/hxQcXFswcmSRurNe6vjyBabb5uJ1 role user
% Error: Cannot delete user while active session exist. Use 'forceout' CLI to remove active session of the user.
The log generated by executing the forceout userTest2 command is shown below.
2025-11-09T19:52:31.694783+01:00 ISE-NODE-2 CARSSetup[94927]: ADEAUDIT 2040, type=FORCEOUT, name=FORCEOUT USER, username=system, cause=Forced logout of all the sessions of a CLI user, adminipaddress=127.0.0.1, interface=CLI, detail=Forced logout of user userTest2 successful
2025-11-09T19:52:31.582890+01:00 ISE-NODE-2 ADE-SERVICE[1336]: [94927]:[info] user: user.c[3319] [system]: Invoked force logout for user: userTest2
2025-11-09T19:52:31.683127+01:00 ISE-NODE-2 ADE-SERVICE[1336]: [94927]:[info] user: user.c[3355] [system]: force logout: CLI user found a match userTest2
2025-11-09T19:52:31.695540+01:00 ISE-NODE-2 ADE-SERVICE[1336]: [94927]:[info] user: user.c[3395] [system]: Force logout on userTest2 successful
In this case, the log ID differs from the previous example, changing from 1018 to 2040. The log also specifies the username that was forcibly logged out, shown in the detail field. As in the earlier scenario, the source IP address is the local address of the node.
In addition to runtime display commands and the show user status command, the generic show running-config username command can be used to view all locally created users directly from the configuration. An example of the output is shown below.
ISE-NODE-2/adminCLI#show running-config username
username adminCLI password hash $6$QN/U7Lie5UN1GsP8$lrsMB0go3C9s6jcGs52GgP3bSAOzznLGOEBIItoYIxcskVXYBQVgl6YqKyZLgJG9IrDDS/cTpBQvLhMYiXcjd. role admin
username userTest2 password hash $6$RGUzlAPxOVStv963$kgD3h3XGJYu56zq65v0jfqkOkyGEJtFSSM0wO3fYN27/z7yUC2.jlhFoLFpITTXN.UjLj/BcwW/TZzz2wOXdl. role admin
Additional options are available to further refine the search:
ISE-NODE-2/adminCLI#show running-config username ?
Possible completions:
  admin       Username (Max Size - 31)
  userTest2   Username (Max Size - 31)
  |       Output modifiers
  <cr>
Possible match completions:
  disabled   User is disabled
  email      User email address
  password   Password and user role
  role       Specify user role
CLI Account Password Policy
As demonstrated earlier, creating a local user account from the CLI is a straightforward process. One of the most critical attributes of any account is its password. To strengthen overall security, ISE enforces a set of password policies that must be followed when defining a password. These policies can be reviewed using the show running-config password-policy command. An example of the output is provided below.
ISE-NODE-2/adminCLI#show running-config password-policy
password-policy
 digit-required
 lower-case-required
 min-password-length         8
 no-username
 password-expiration-days    45
 password-expiration-enabled
 password-lock-enabled
 password-lock-retry-count   3
 upper-case-required
!
Contrary to what might be assumed, these policies are read-only when accessed from the CLI. Any modifications must be performed through the GUI. Attempting to make changes from the CLI results in the following error message.
ISE-NODE-2/adminCLI(config-password-policy)#password-expiration-days 12
% Error: Configuration changes ignored. Password policy is replicated from ISE administration node. Please set CLI password policy using the ISE web UI on the primary administration node.
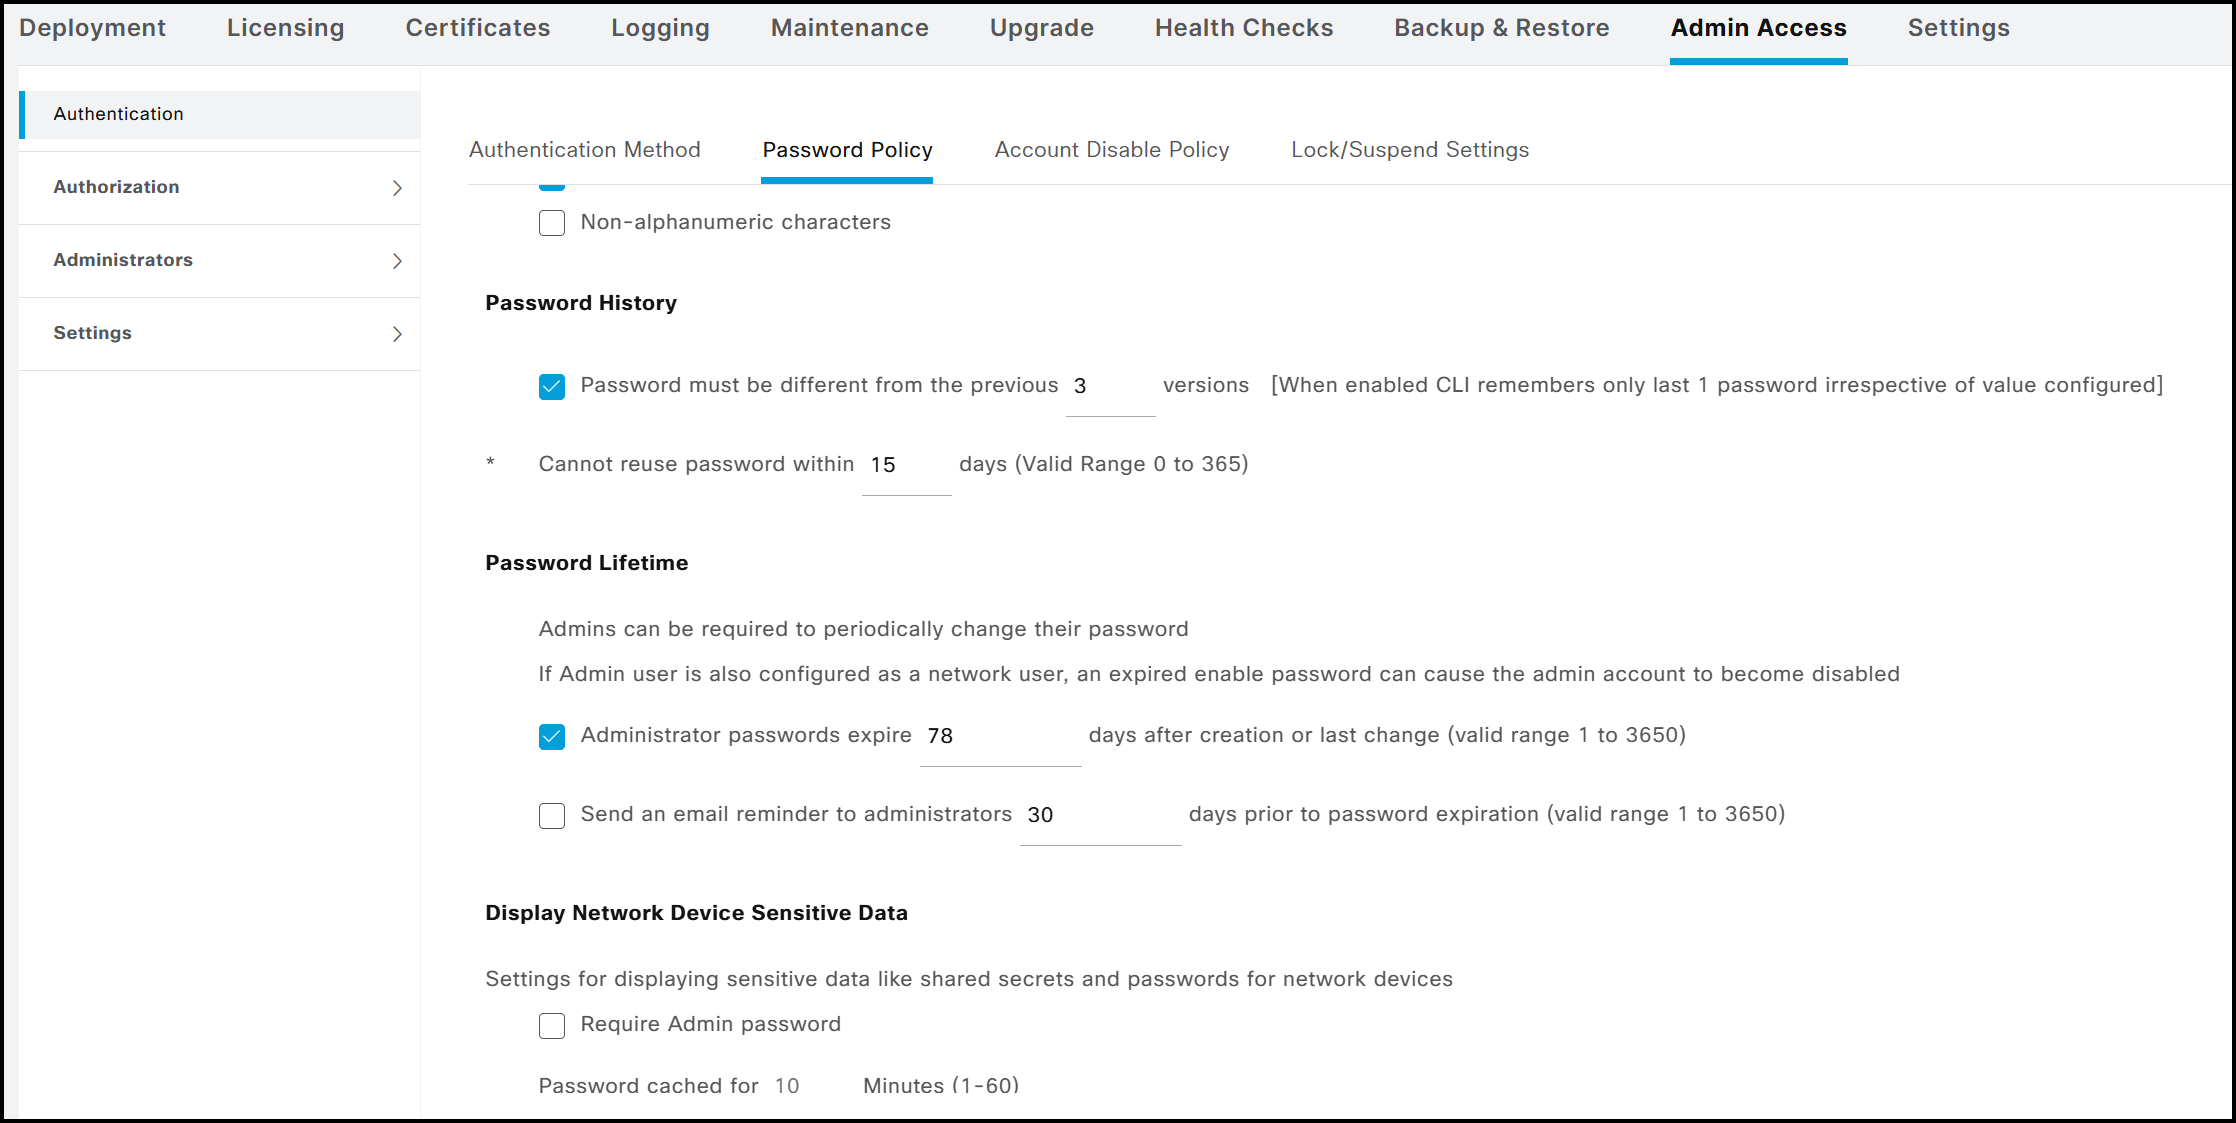
Therefore, all changes to password policies must be performed from the GUI using an administrator-level account, such as Super Admin or System Admin. It should be noted that not all GUI configuration options apply to accounts created via the CLI (for instance, the policy Password must not contain → This word or any of its characters in reverse order). The configuration menu for password policies can be found under Administration → System → Admin Access → Authentication → Password Policy. For policies applied to accounts created through the CLI, any modifications are automatically reflected in the corresponding CLI output. For example, if the maximum password lifetime is changed from its default value to a custom setting, such as 78 days, this updated value will also appear in the CLI output, as shown below.
ISE-NODE-2/adminCLI#show running-config password-policy
password-policy
 digit-required
 lower-case-required
 min-password-length         8
 no-username
 password-expiration-days    78
 password-expiration-enabled
 password-lock-enabled
 password-lock-retry-count   3
 upper-case-required
!
Having reviewed the creation, management, and monitoring of accounts via the CLI, the next section examines these same operations from the GUI perspective.
GUI Access and Privileges
The second, and most frequently used, method for managing ISE is through the GUI. From there, administrators can:
- Manage deployments, help desk operations, network devices, and node monitoring and troubleshooting.
- Manage ISE services, policies, administrator accounts, and overall system configuration and operations.
- Change administrator and user passwords.
GUI Account Creation
Administrator accounts can be managed under Administration → System → Admin Access → Administrators → Admin Users. From this page, new accounts can be created and all available attributes can be assigned to them.
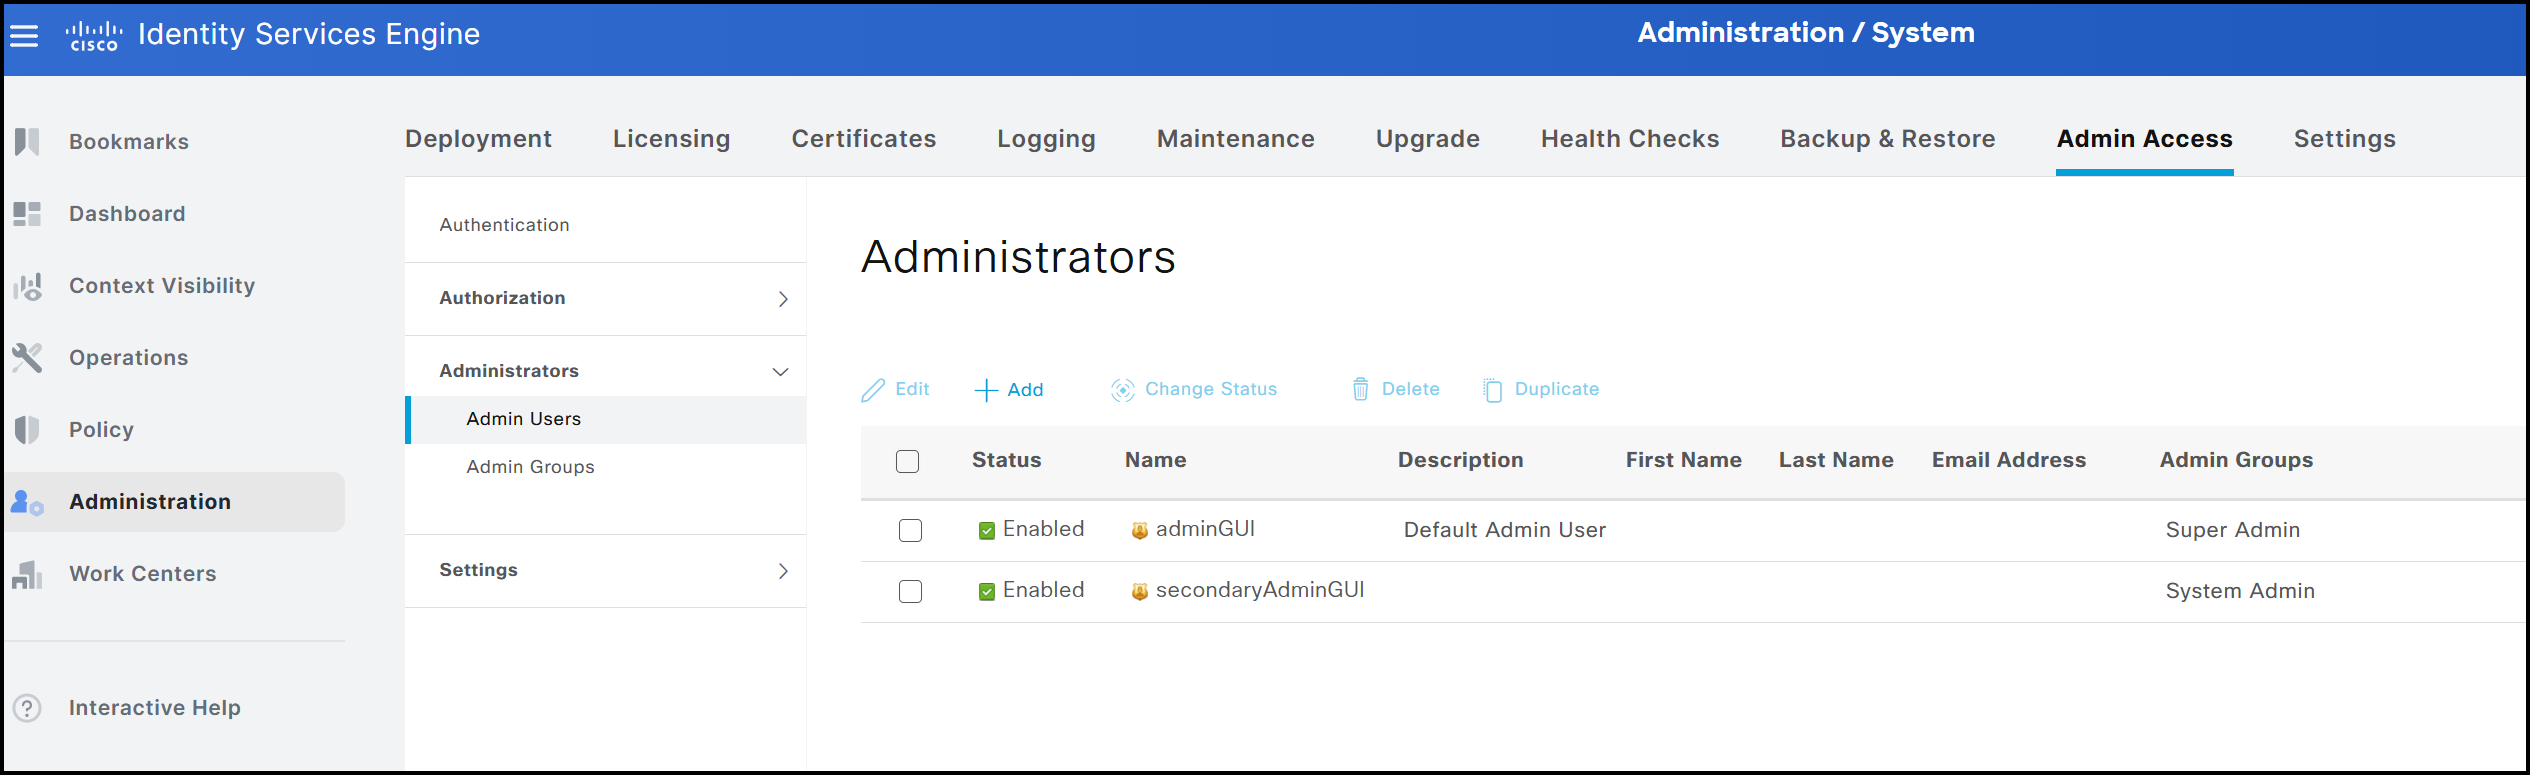
In addition to creating users, the same interface allows them to be deleted or disabled. When a user is disabled, any attempt to log in with the associated credentials will be denied access to the ISE GUI. It is important to note that these users are stored internally within the ISE cluster. Unlike those created via the CLI, GUI-based users can access the individual graphical interfaces of each node in a distributed deployment.
Particular attention should be given to the administrator account created during the initial setup. This account cannot be deleted or disabled, unlike the default CLI account. Consequently, only a limited subset of its attributes can be modified. The figure below shows all configurable attributes for each administrator account.
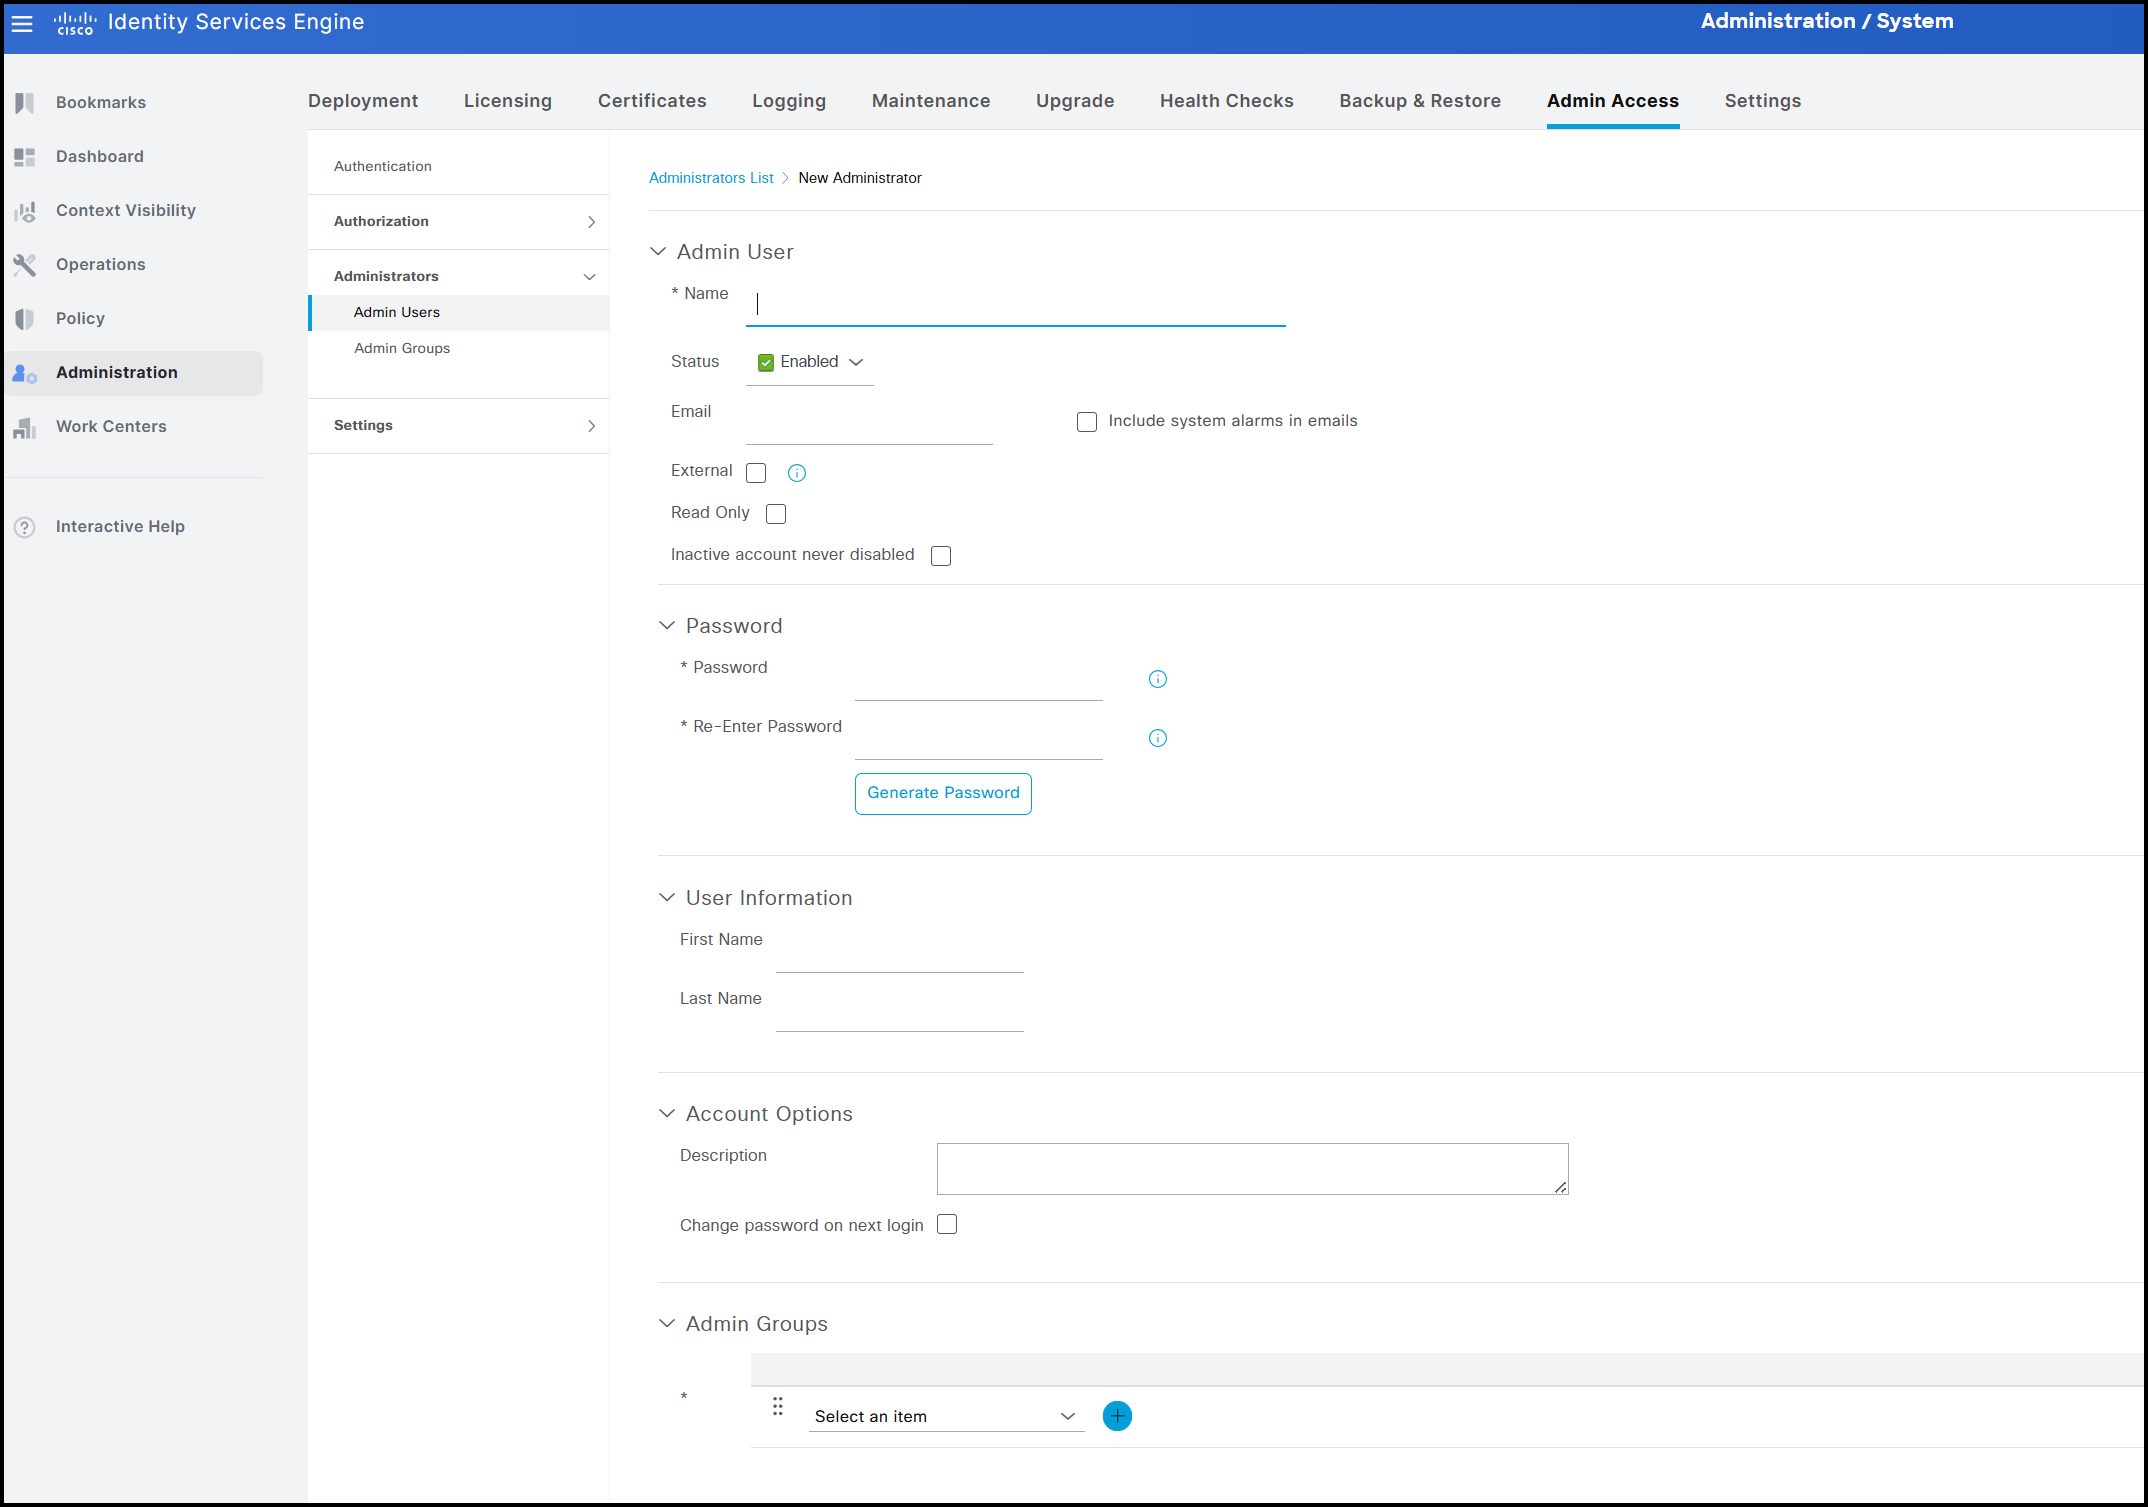
As mentioned, among these attributes, the ones that cannot be modified for the administrator (Super Admin) account created during the node setup are the following:
- Account status
- Read-only setting
- Requirement to change the password at the next login
- Administrator groups assigned to the account
Administrator access in ISE is governed by the Role-Based Access Control (RBAC) model. Access permissions are determined by the group to which the administrator belongs when accessing the GUI. These groups may include local accounts defined within the ISE cluster or external groups, such as those defined in Active Directory. Based on group membership, ISE determines which features, pages, and information are accessible to each administrator.
In contrast to the CLI, which supports only two role types, the GUI offers a significantly broader range of administrator groups and also supports the creation of custom groups.
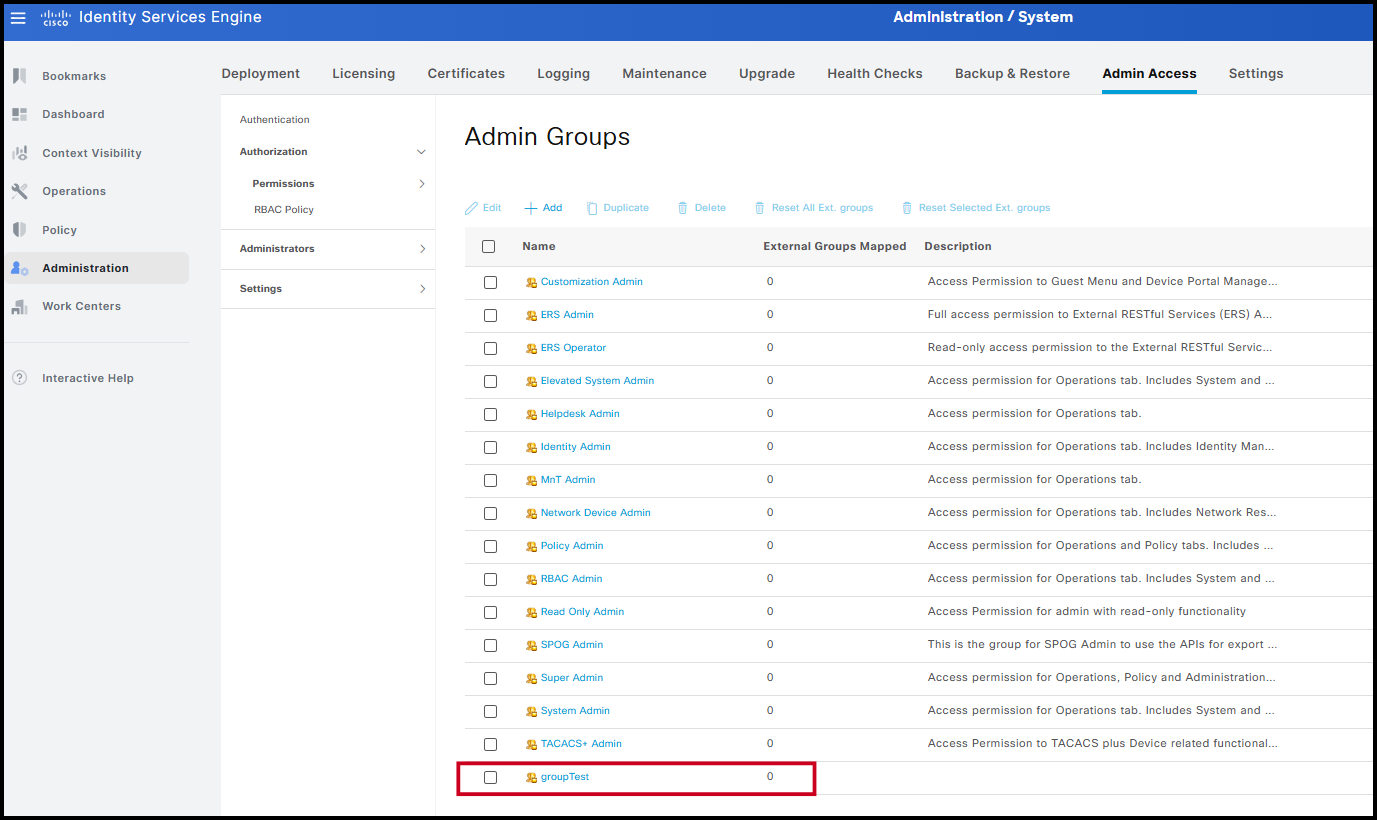
The image below illustrates all default groups available in the GUI.

The option to create custom groups is particularly useful when there is a need to define profiles with specific levels of access or visibility. For example, a group may be configured to block access to all TACACS-related information. As a result, both the corresponding menus and data remain hidden to any user belonging to that group.
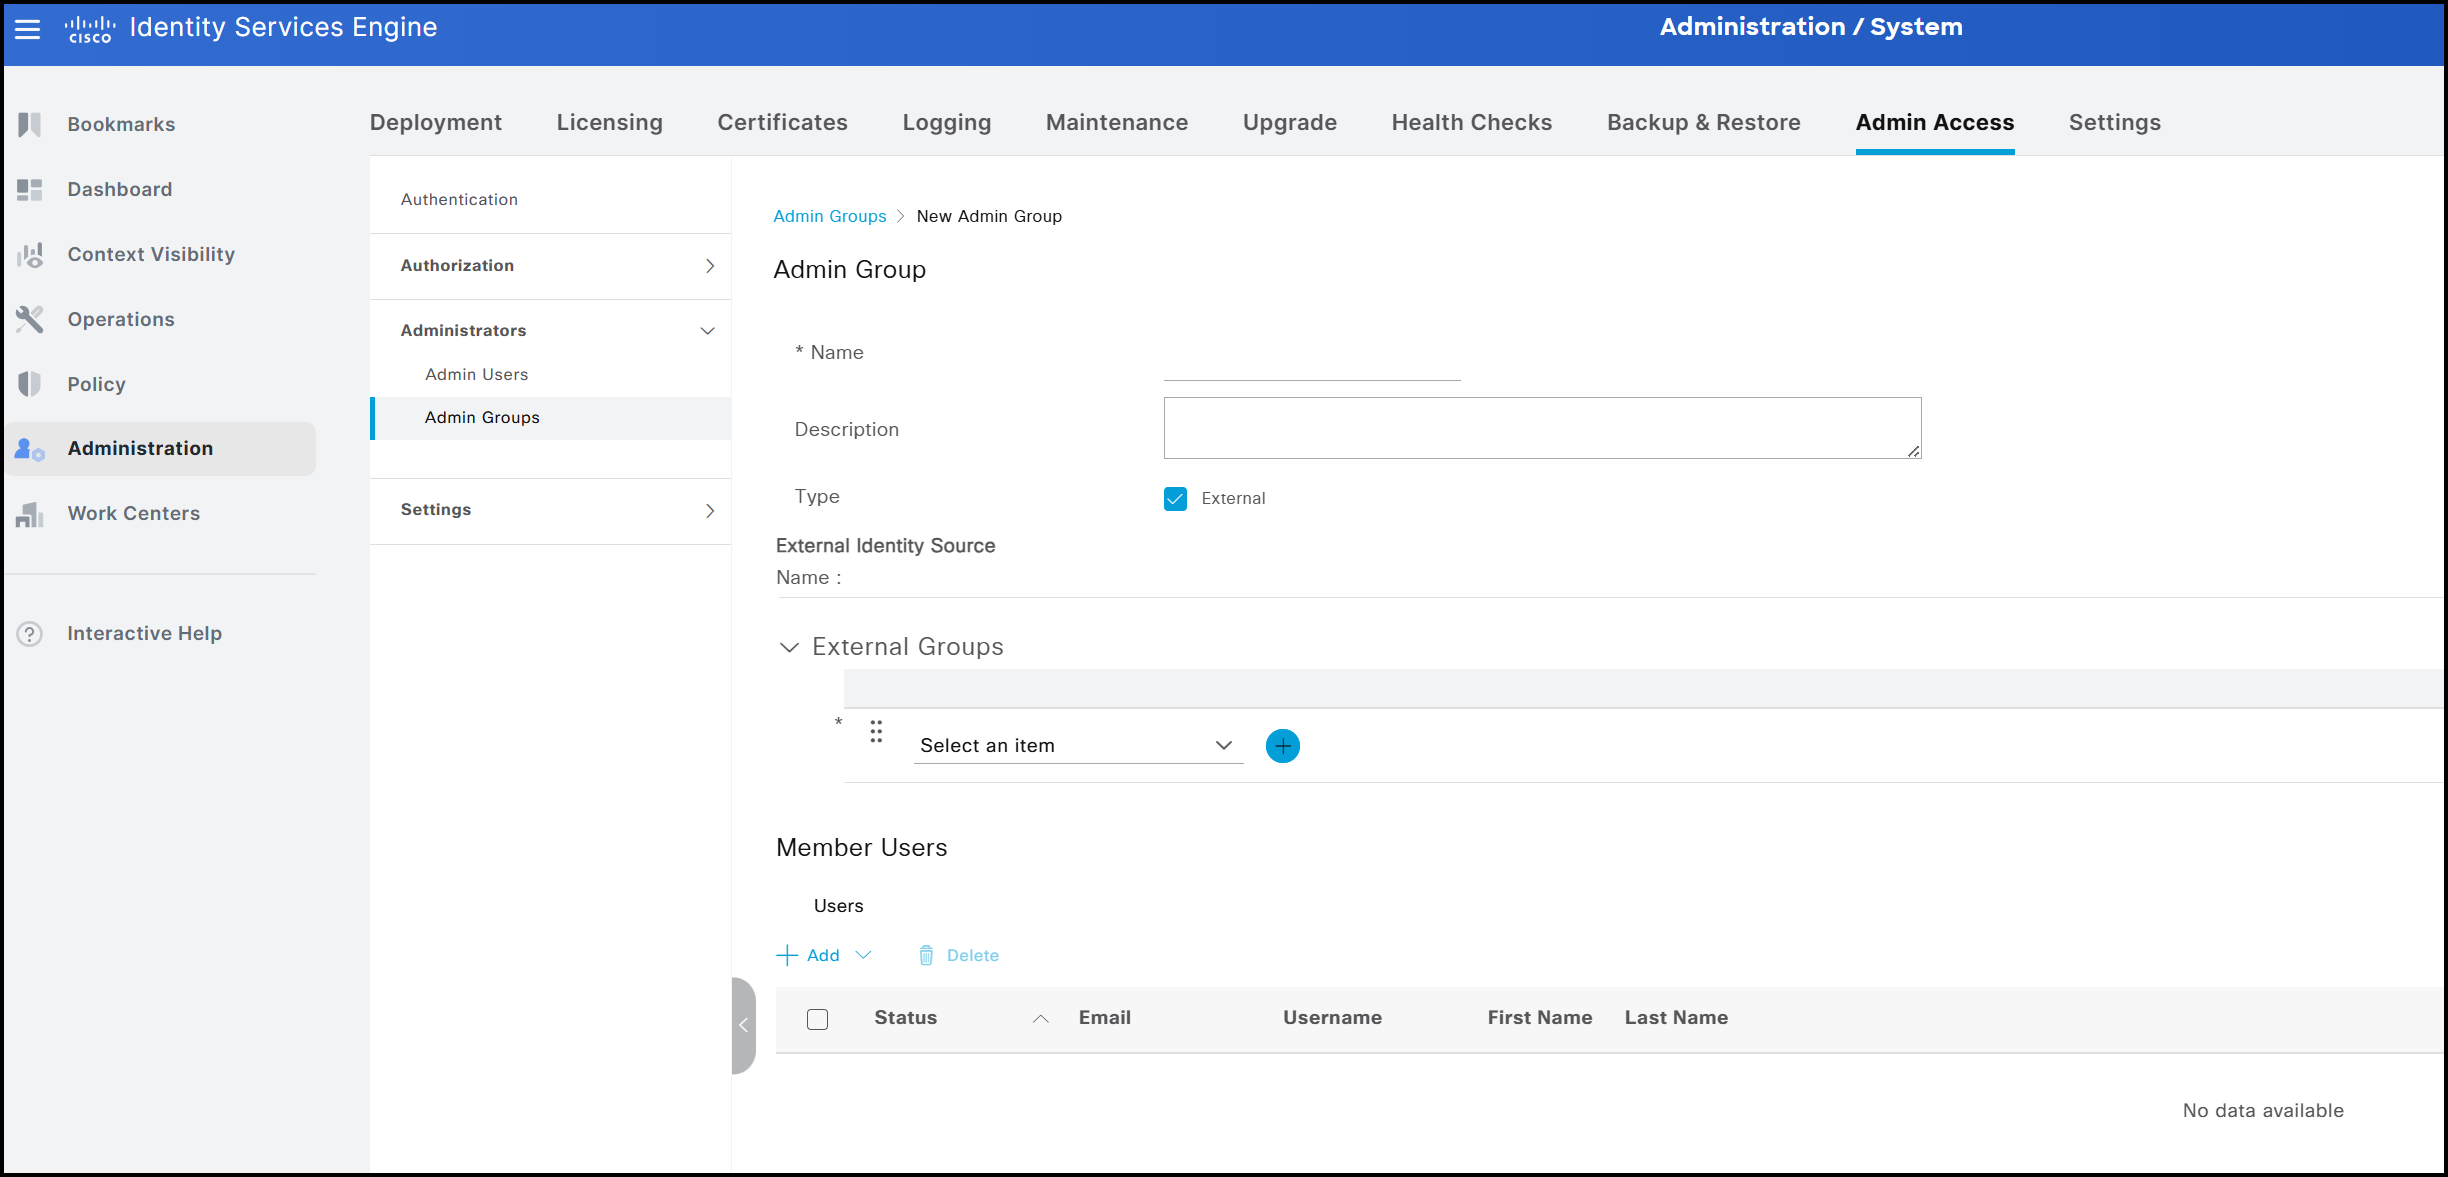
As mentioned earlier, administrator groups can be either internal or external. Internal groups consist of local administrator accounts created within ISE, whereas external groups are mapped to users who belong to groups defined in an external identity source, such as Active Directory. When a custom group is created, it is defined as internal by default. To associate it with one or more external groups, the External option must be selected and the appropriate AD groups mapped to the local group.
To better illustrate how RBAC and administrator groups interact, a temporary test group named groupTest is created. This group will be used shortly when defining the RBAC policy.
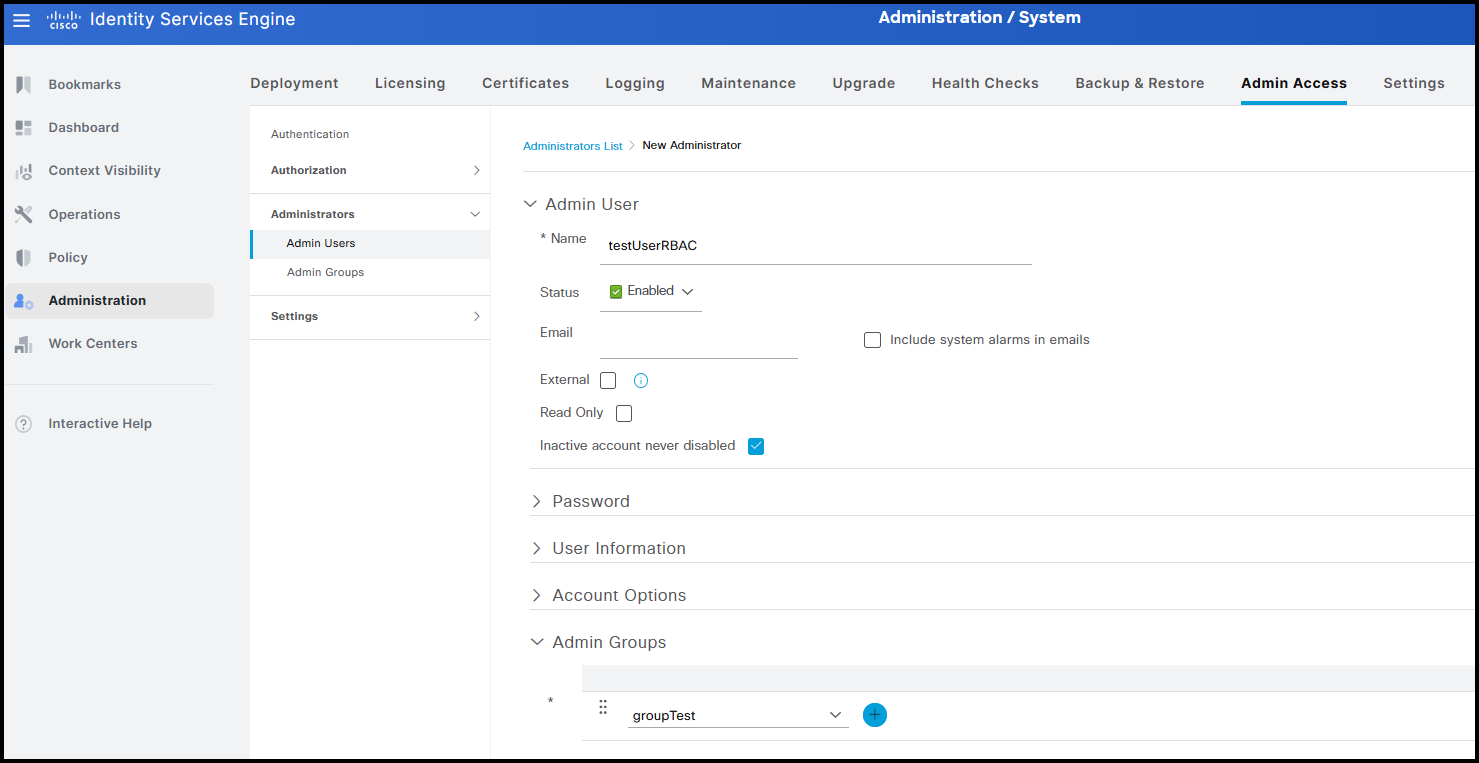
Once the group has been created, it is possible to associate a new user named testUserRBAC with it.
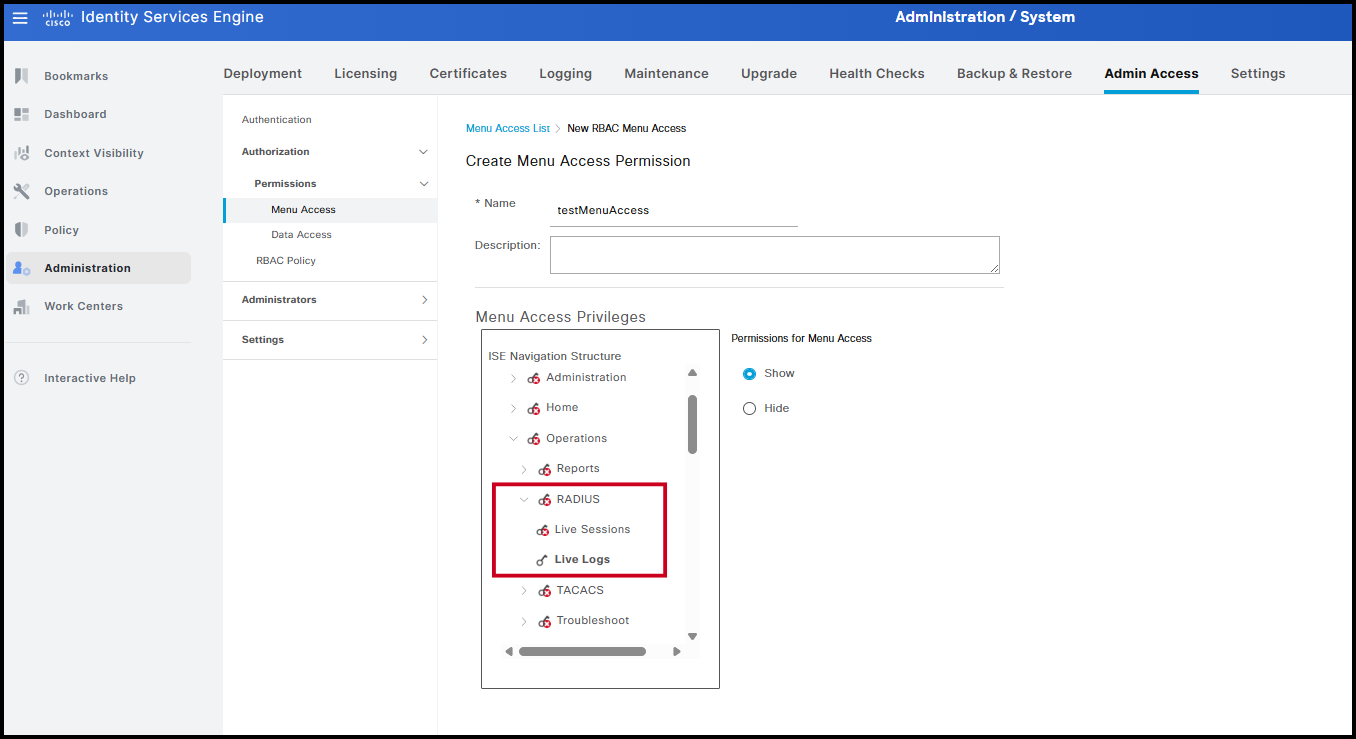
The next step is to define which resources the group can access. This requires two components: RBAC policies and permission objects. Permission objects determine which menus and data are visible in the GUI for users in a specific group, while RBAC policies, created at the final stage of the workflow, integrate all components. ISE provides a number of default permission objects for both menu and data visibility. The Menu Access interface shown below allows administrators to specify which menus are accessible. The drop-down list mirrors the structure of the ISE GUI, and menu visibility can be controlled using the Show and Hide options.
For demonstration purposes, a new permission object named testMenuAccess is created. In this example, visibility is restricted to the Live Logs page, allowing access to information about network access attempts by endpoints.
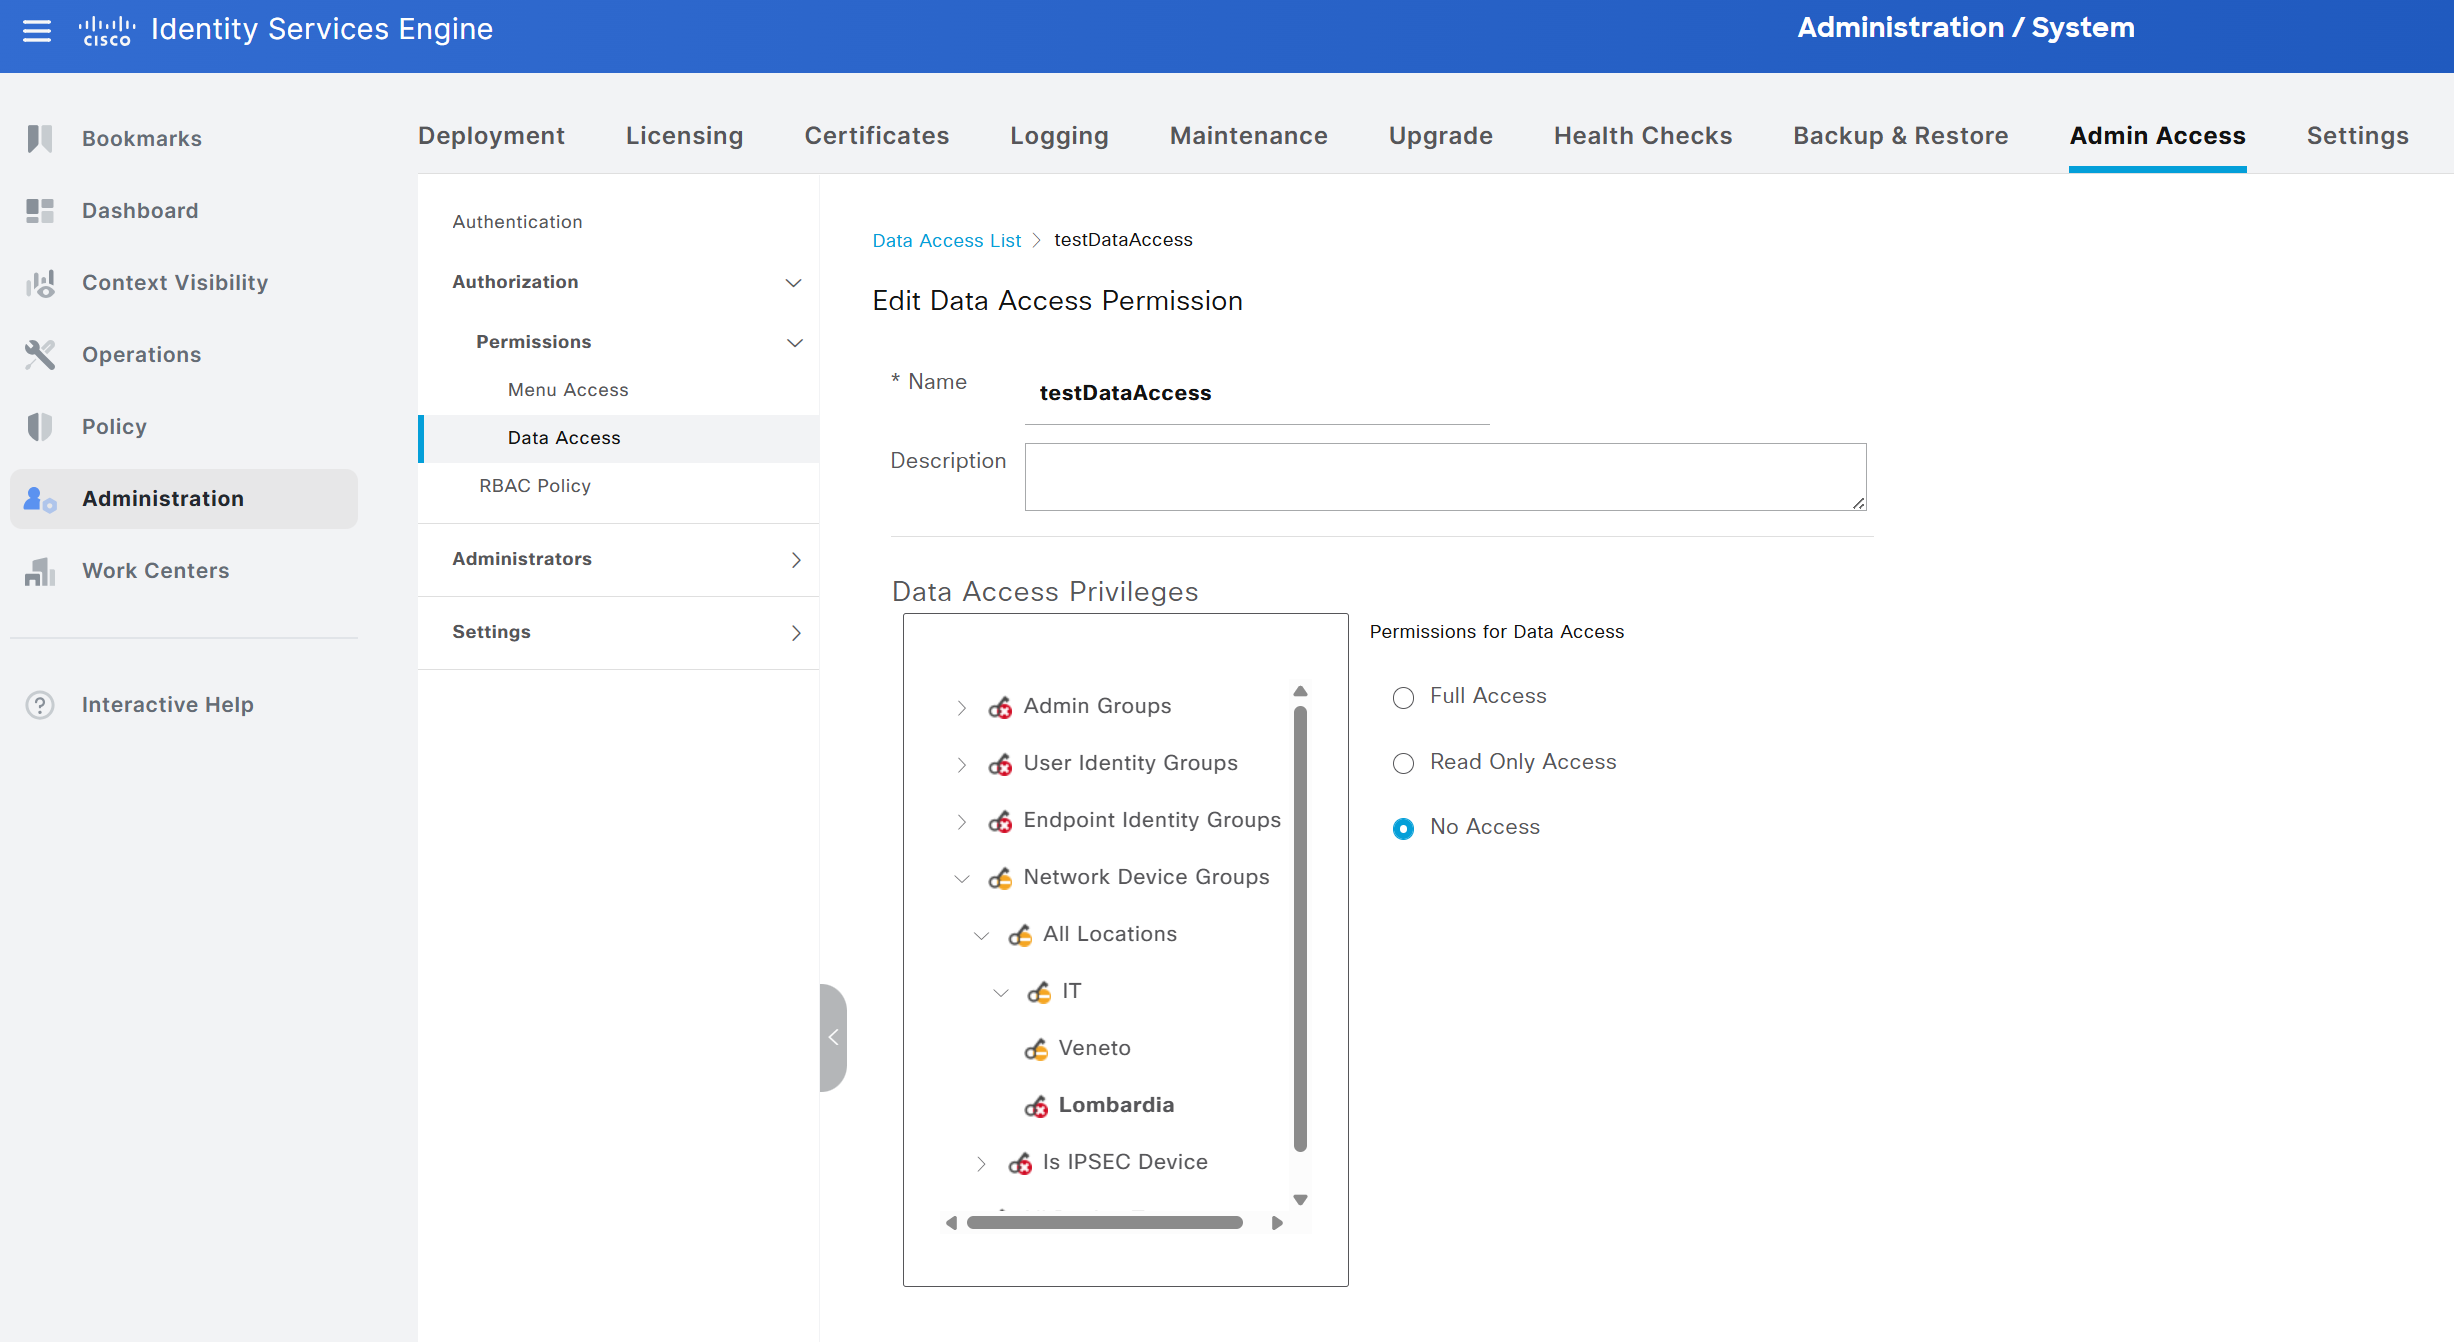
The same approach applies to data masking through the Data Access tab. A new permission object is created by selecting Add and naming it testDataAccess. All information available in ISE can be shown or hidden according to the visibility requirements of the selected group. In this example, only information related to network devices associated with the location All Locations → IT → Veneto has been made visible.
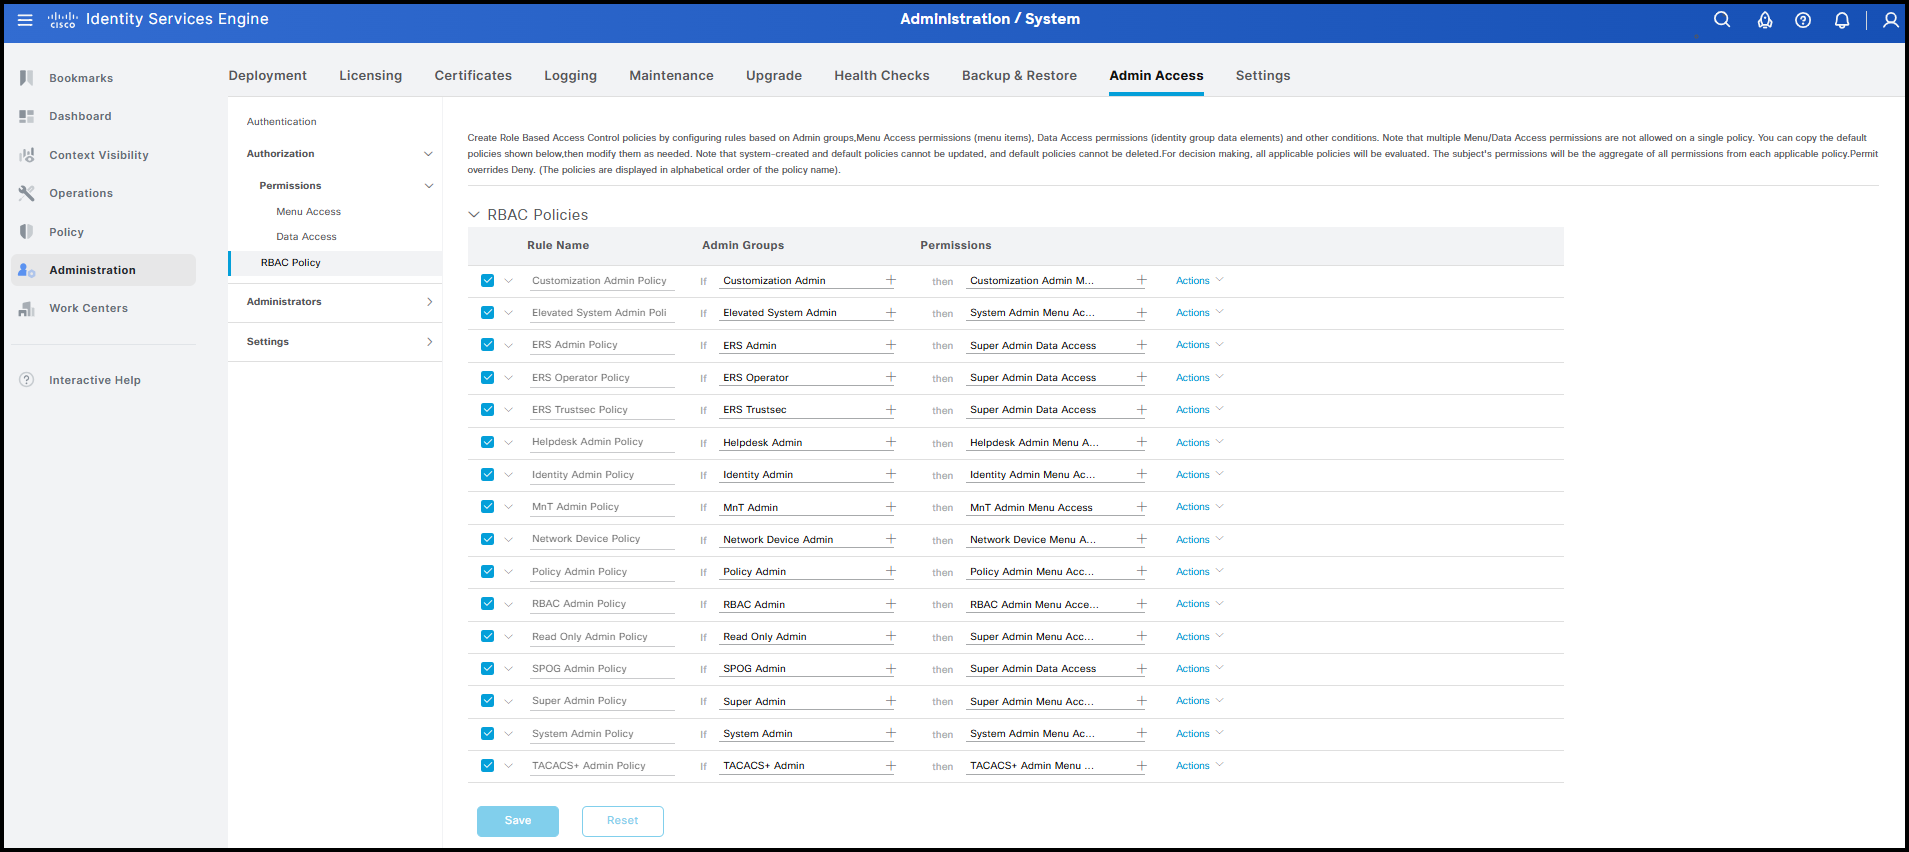
After creating these permission objects, the final step is to combine them into an RBAC policy. RBAC policies associate a group with the defined visibility settings. As in other areas of ISE, several default RBAC policies are available and can be applied simply by assigning newly created users to the corresponding default groups. Note that the default RBAC policies cannot be modified or disabled.
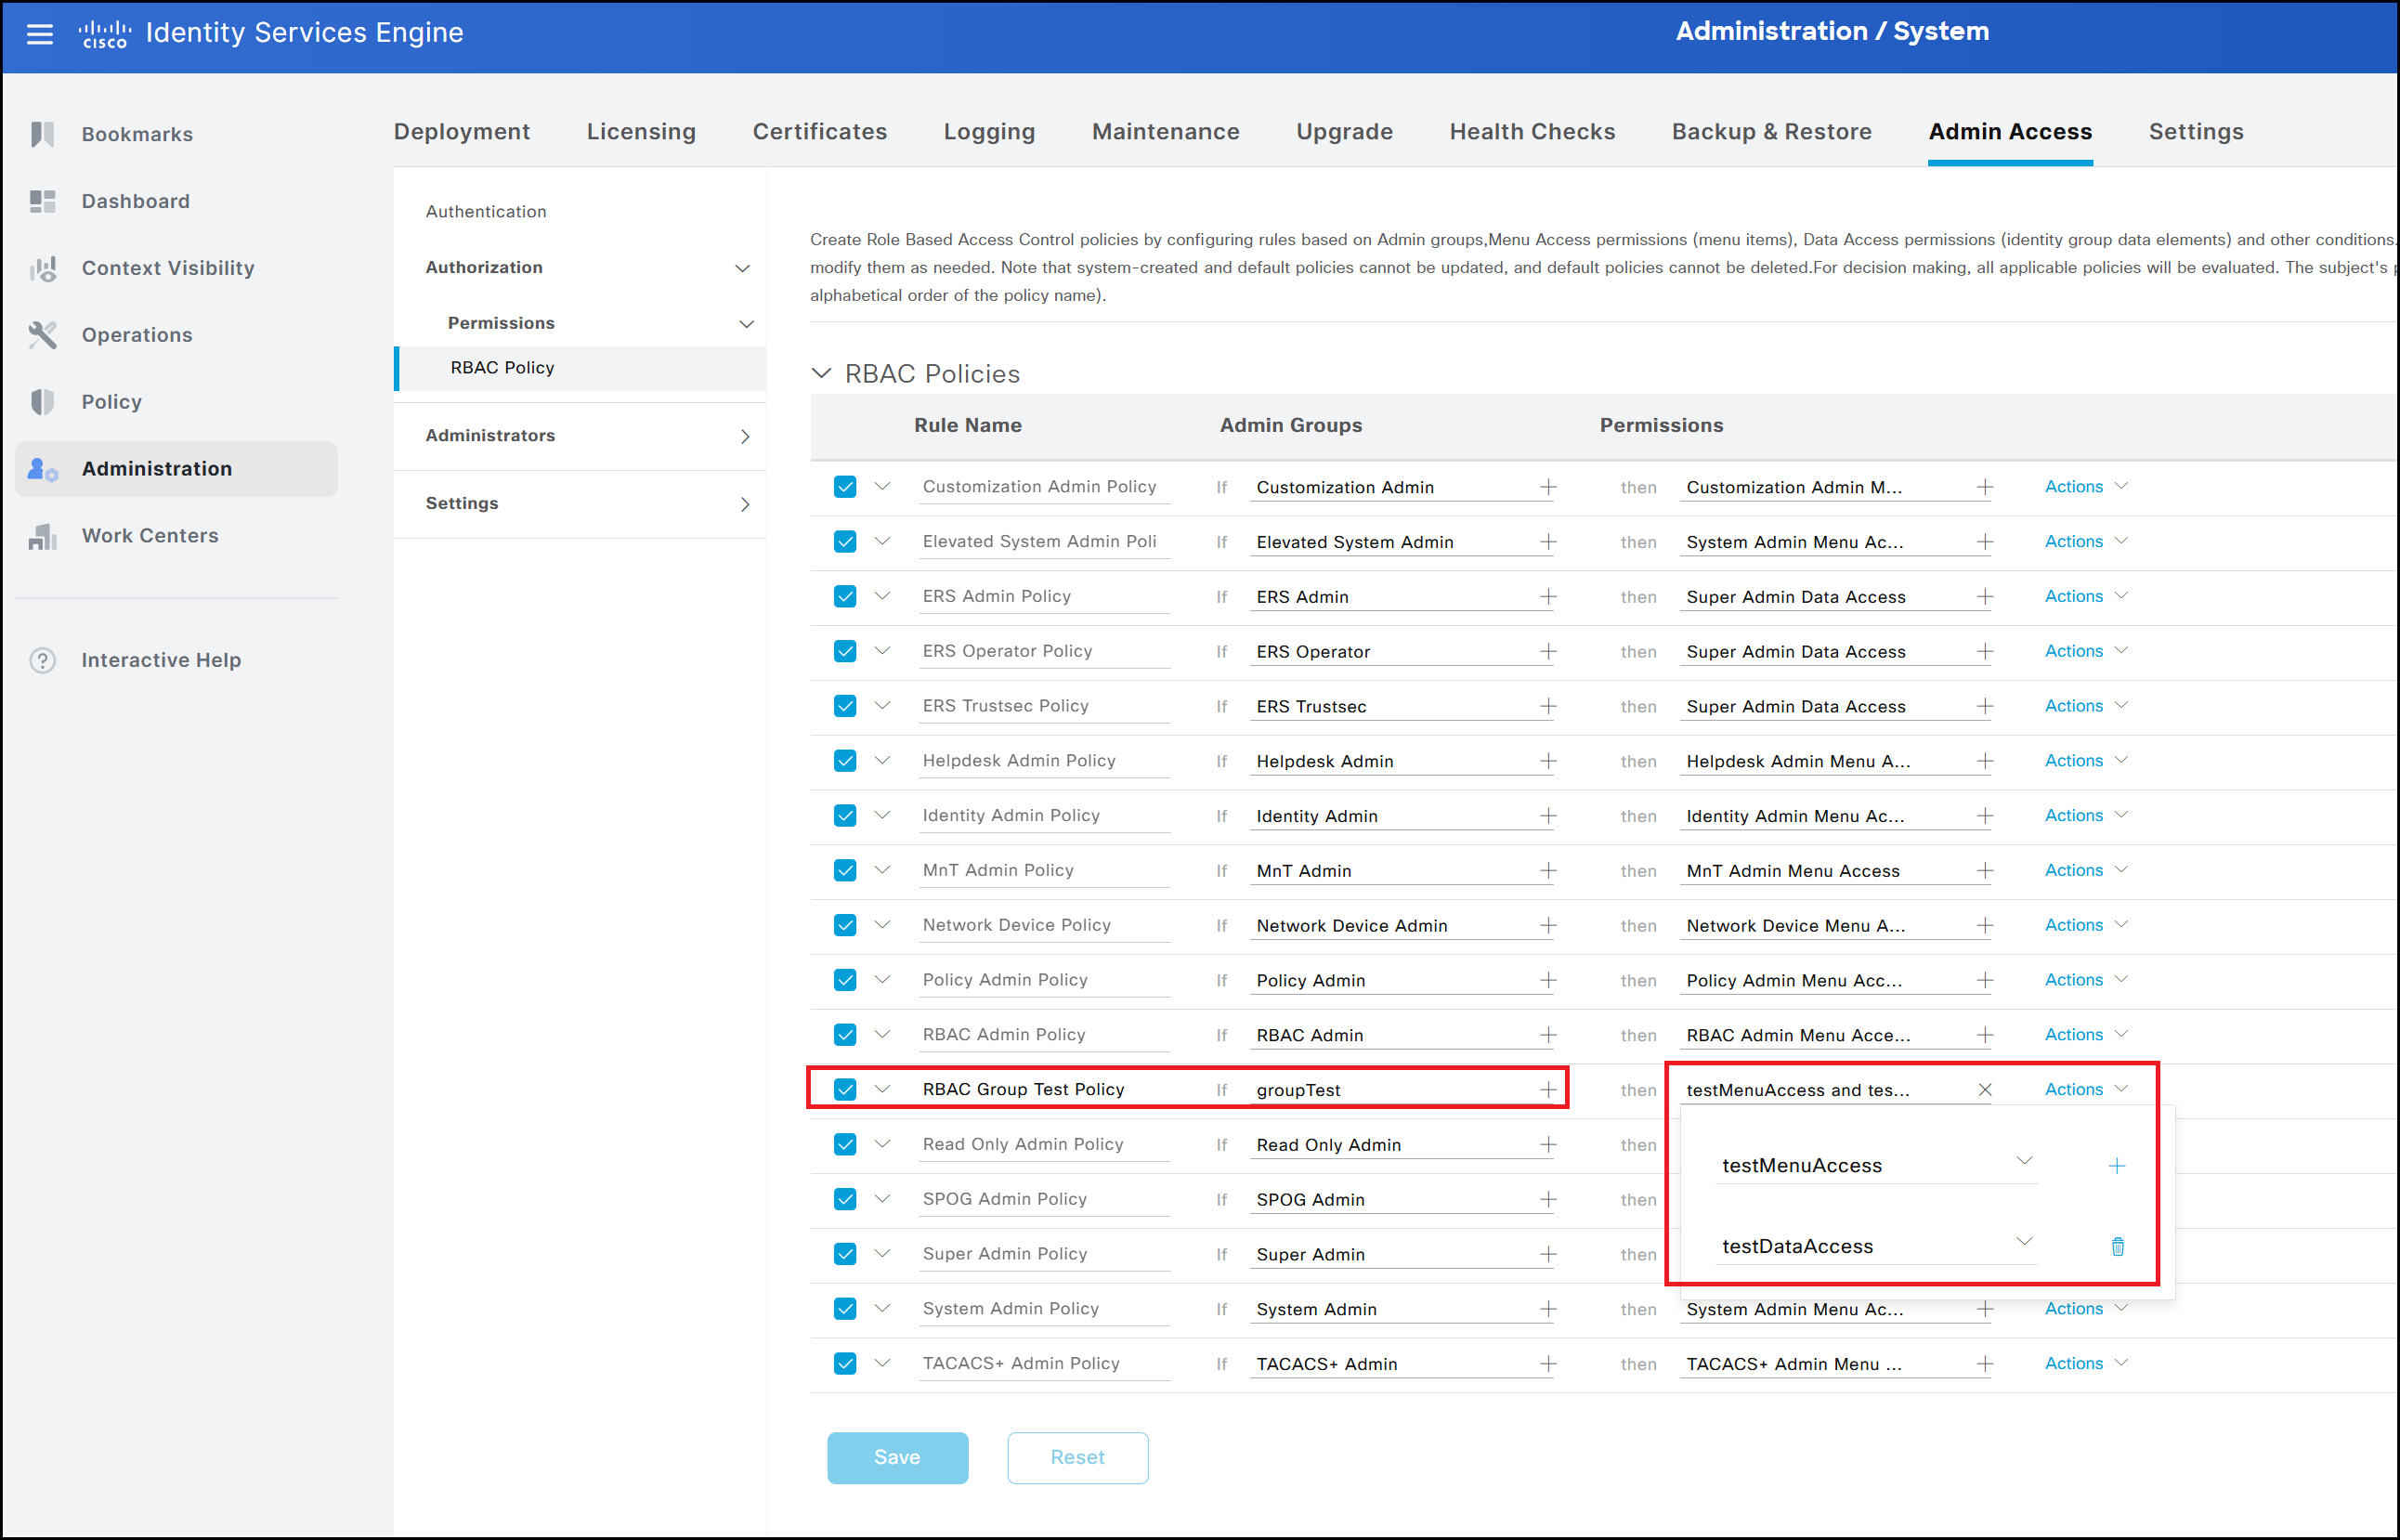
The logic behind RBAC is straightforward. For each policy, ISE checks whether a user belongs to the specified group. If the condition is met, the associated Menu Access and Data Access objects are applied to that user. To create the final policy, select Actions from any existing policy and choose Insert New Policy. Assign a name, such as RBAC Group Test Policy, and specify the group to which the policy applies, in this case groupTest. The last step is to associate the visibility settings we prepared earlier, testMenuAccess and testDataAccess.
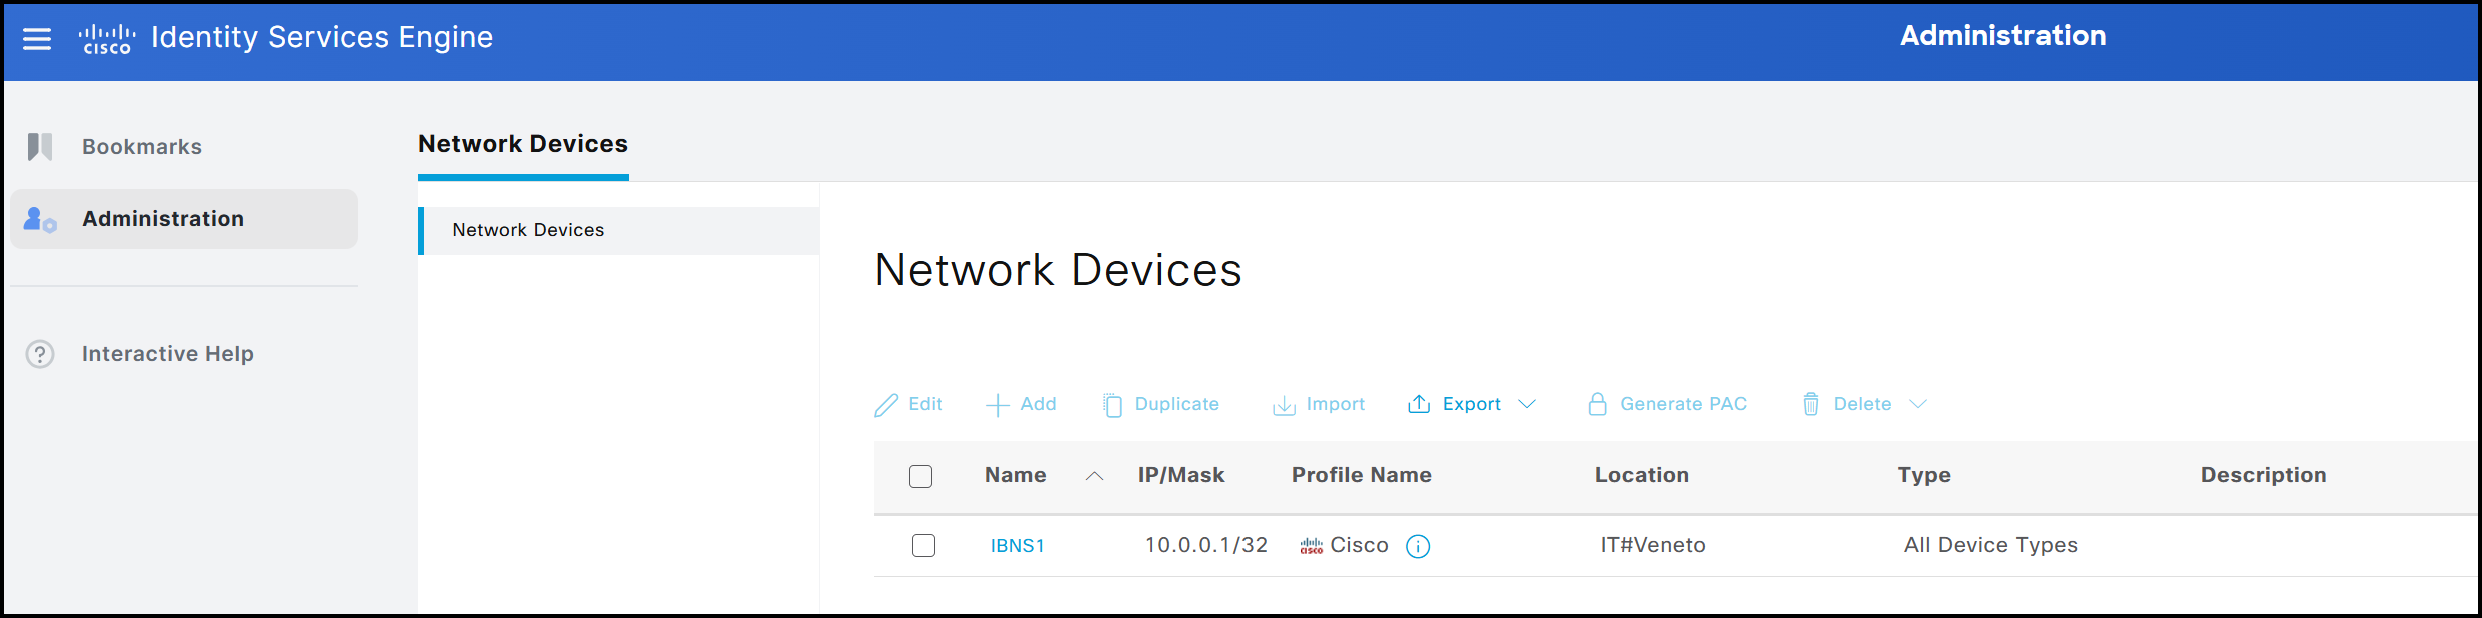
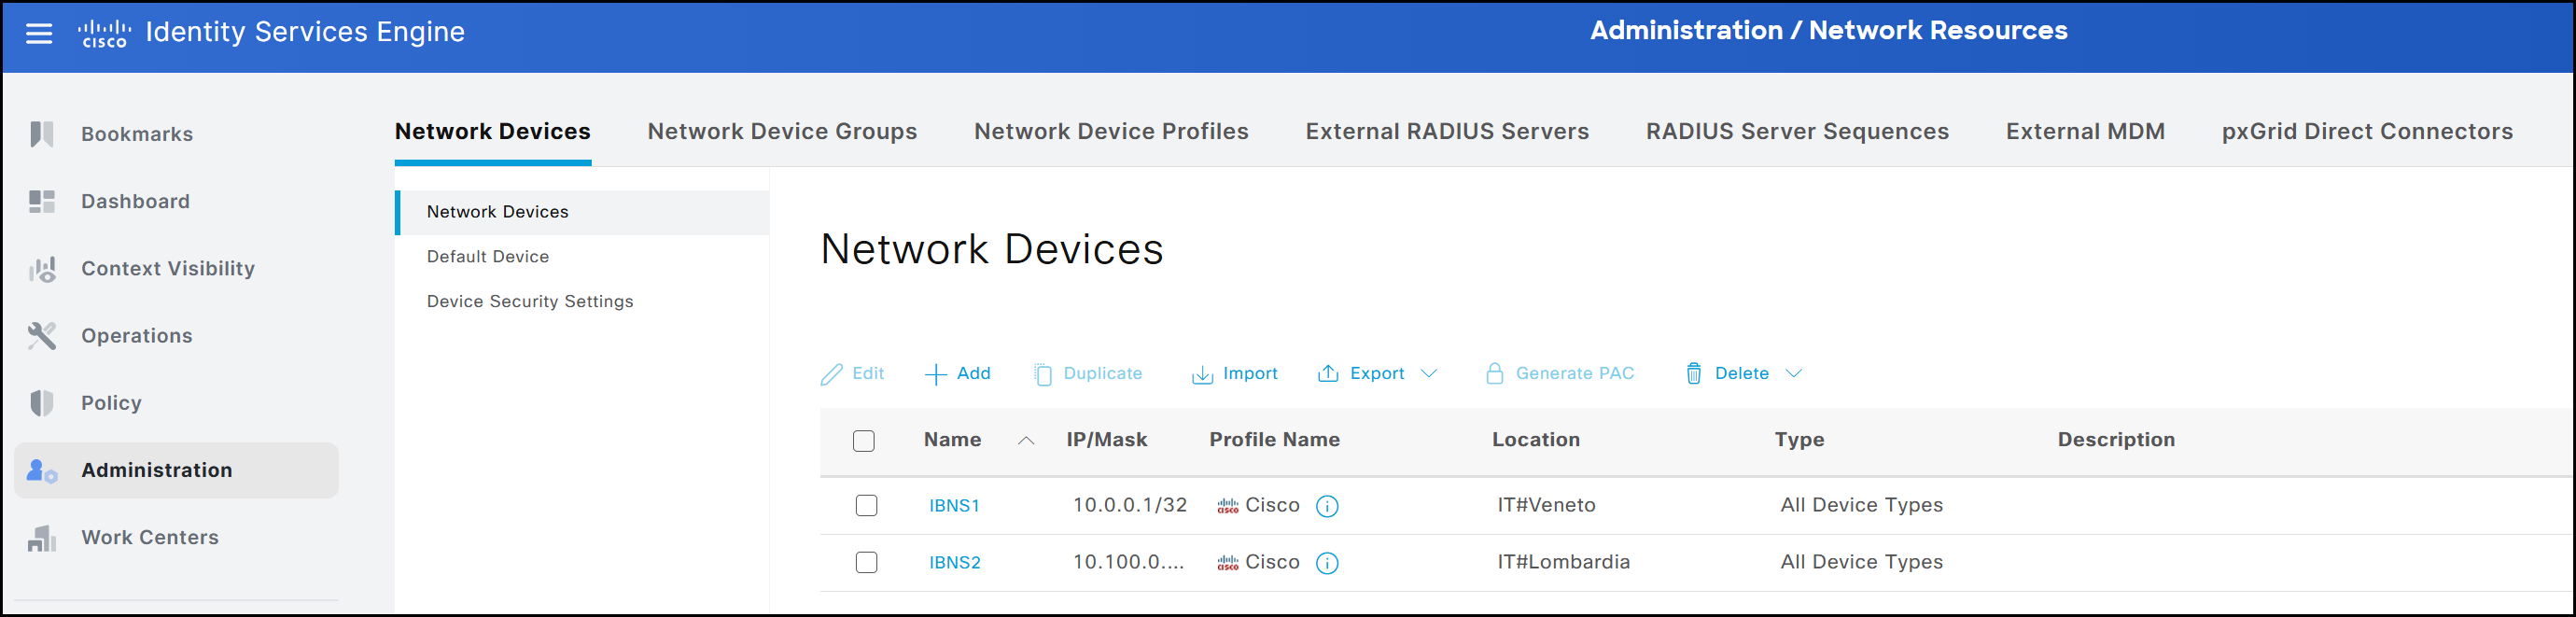
The final result is shown in the figure below. The user’s visibility is restricted according to the settings defined in the previous steps, both for menus and data. Specifically, the user can access only the interface dedicated to Network Devices. Within this interface, visibility is limited to devices associated with the IT -> Veneto location, while devices associated with other locations, such as IT -> Lombardia, remain hidden.
This shows the visibility of the admin user belonging to the Super Admin group.
GUI Account Verification
The GUI also allows viewing currently logged-in users, similar to the CLI. This information can be accessed by navigating to Administration → System → Admin Access → Settings → Session → Session Info.
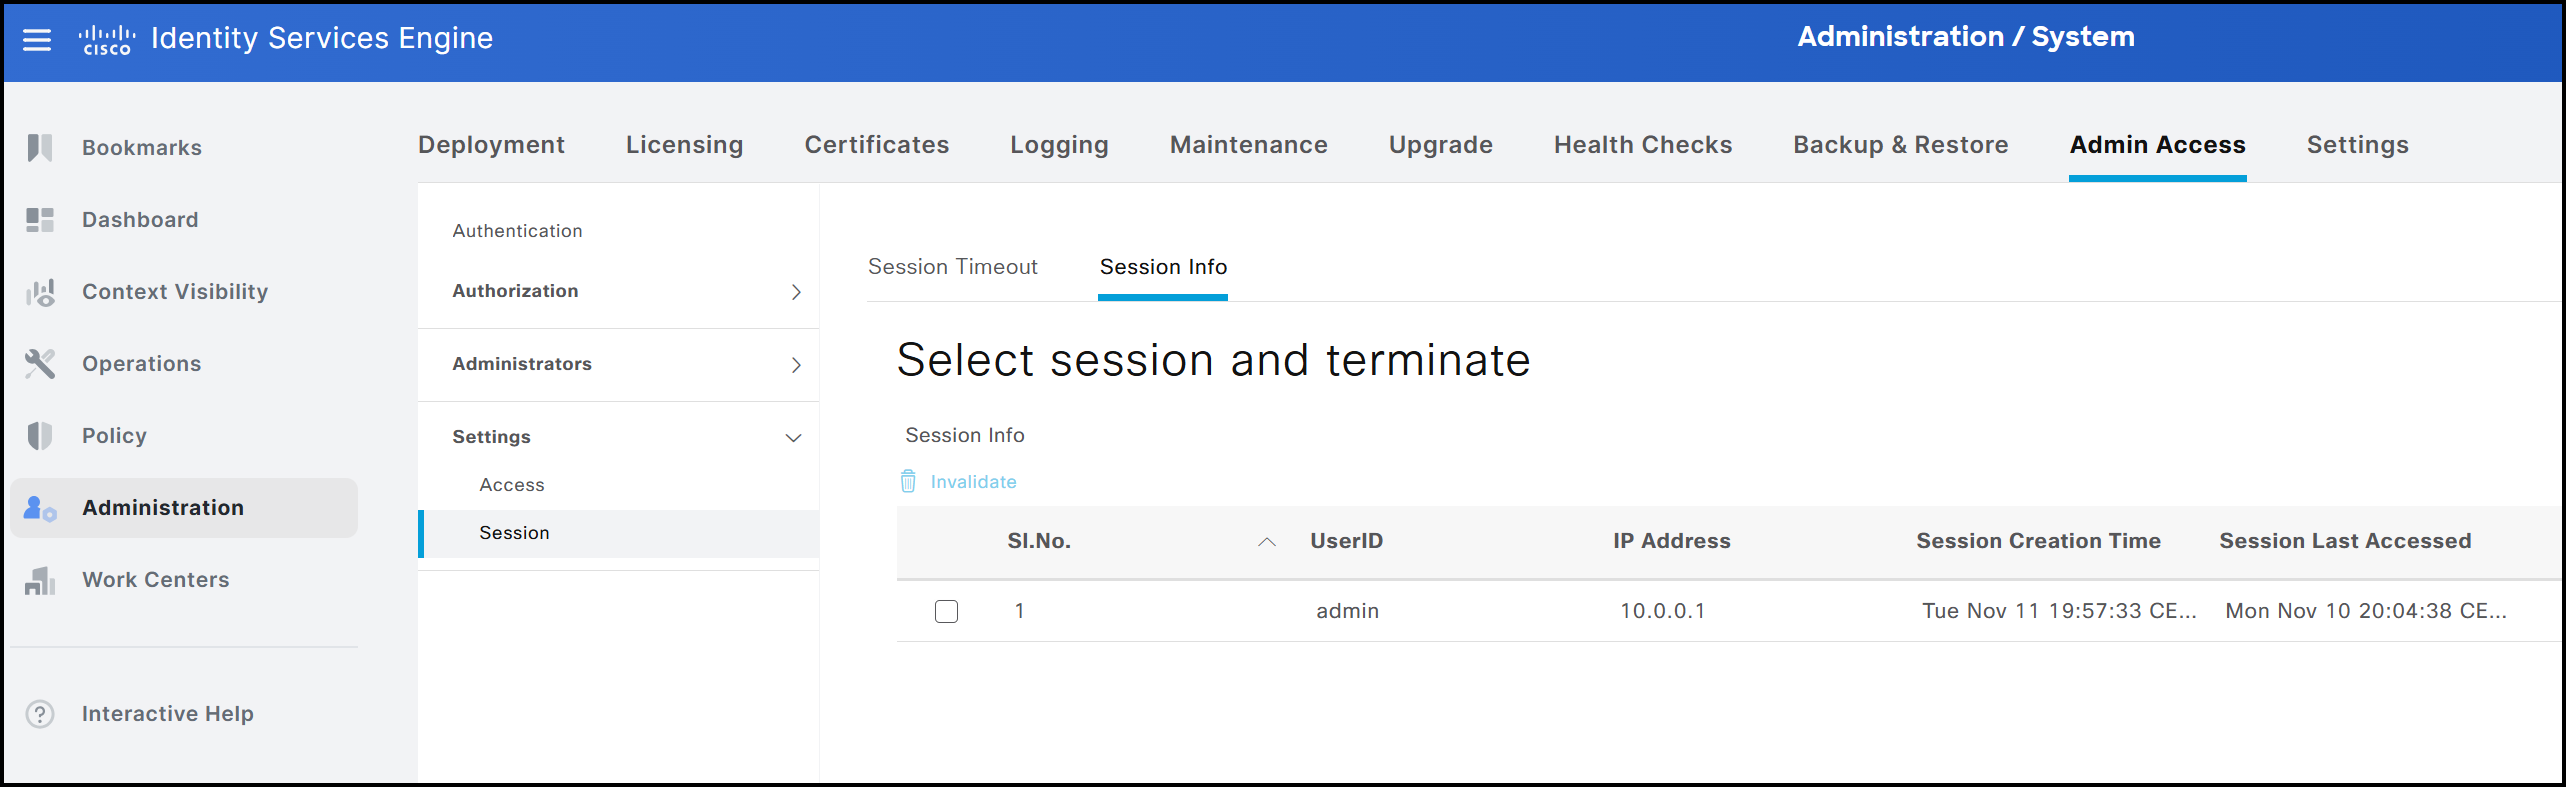
This view displays the following details:
- The username of the active session, in this example admin.
- The IP address from which the user is connected, here 10.0.0.1.
- The timestamp indicating when the current session was established, shown as 09 November.
- The timestamp of the previously created session, shown as 09 November.
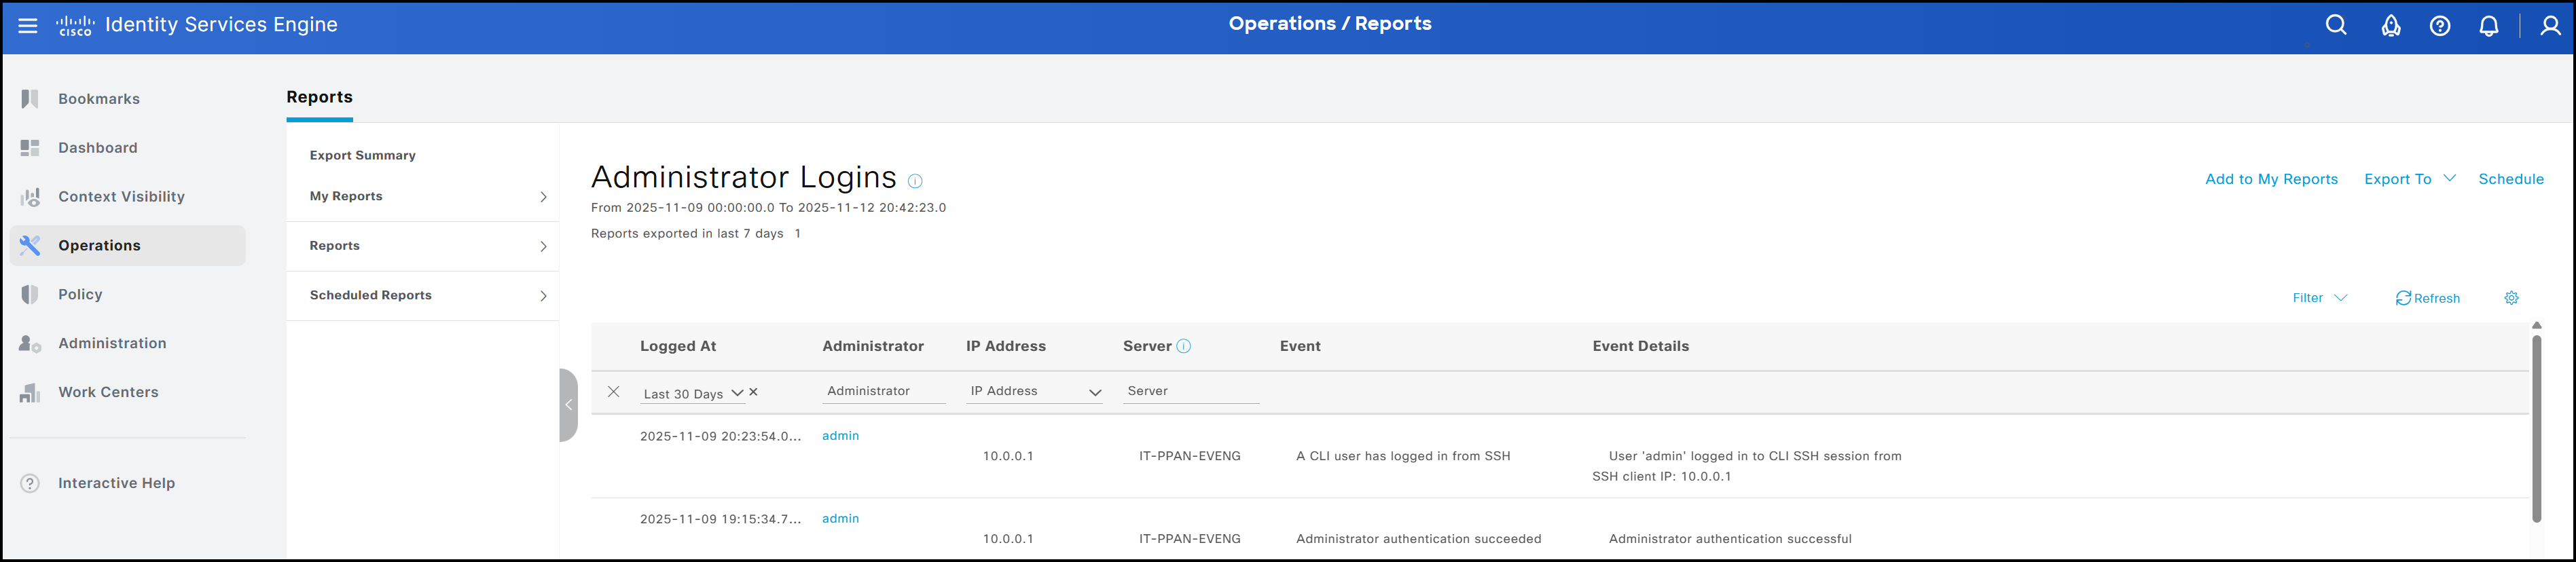
As with the CLI, the GUI also allows a Super Admin to forcibly terminate another user’s session. This can be done by navigating to Administration → System → Settings → Session → Session Info. The session to be ended can be selected on this page, and clicking Invalidate will terminate it. In addition to viewing currently active sessions, it is also possible to review the historical record of user sessions, similar to using the show logins cli command in the CLI. The figure below shows a summary. Both users created via CLI and those created through the GUI are included. To access this summary, navigate to Operations → Reports → Reports → Reports → Audit → Administrator Logins.
GUI Account Password Policy
As discussed in the CLI section, password policies can only be configured through the GUI. These policies govern the composition of user passwords and are organized into 4 subsections within the interface:
- Password must not contain

- Password must contain at least one character of each selected type
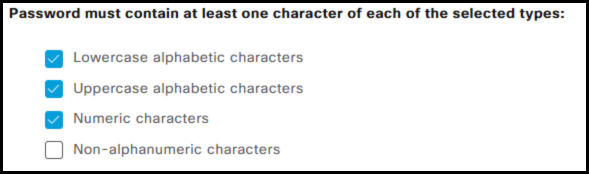
- Password History

- Password Lifetime
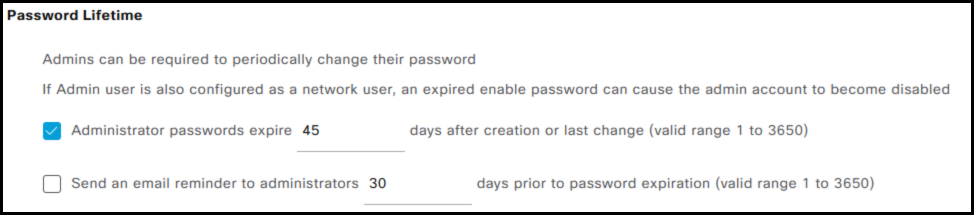
In addition, it is possible to specify the minimum password length. Configuration entries marked with the ^ symbol do not apply to CLI-created accounts. For instance, the system cannot check for the presence of a specific word (or its reverse) within a password. Beyond password policies, the GUI also allows administrators to configure account inactivity and suspension settings. For inactivity, an account can be automatically disabled after X days, as illustrated in the figure. Consecutive failed login attempts can be managed by:
- Suspending the account for X minutes.
- Locking the account, thereby rendering it disabled; to re-enable it, an administrator with the appropriate permissions must manually reactivate the account via the GUI as well.
Takeaways
The creation of local accounts on ISE nodes is generally not recommended in production environments. Instead, it is preferable to manage accounts through the GUI, which provides a comprehensive set of configuration options. I hope this post has been helpful. If you have any additional information to share, feel free to reach out via social media. See you in the next one! 🙂